

Napa Cabbage Container Gardening: Ever dreamt of harvesting fresh, crisp Napa cabbage right from your own patio? I know I have! Forget sprawling fields; with a few clever tricks, you can cultivate this versatile veggie in containers, no matter how small your space.
For centuries, Napa cabbage, also known as Chinese cabbage, has been a staple in Asian cuisine, gracing everything from kimchi to stir-fries. Its mild flavor and satisfying crunch make it a culinary favorite. But did you know you don’t need a sprawling farm to enjoy its goodness?
In today’s world, where access to fresh, healthy produce can be a challenge, Napa Cabbage Container Gardening offers a fantastic solution. Imagine the satisfaction of snipping off leaves for a salad or adding them to your favorite soup, knowing they came from your own loving hands. Plus, growing your own food is incredibly rewarding and connects you to the natural world. This DIY guide will equip you with all the knowledge you need to successfully grow Napa cabbage in containers, from choosing the right pot and soil to warding off pests and harvesting your bounty. Let’s get started and transform your balcony or patio into a thriving mini-garden!
Growing Napa Cabbage in Containers: A Beginner’s Guide
Hey there, fellow gardening enthusiasts! I’m so excited to share my experience with growing Napa cabbage in containers. It’s surprisingly easy and rewarding, even if you don’t have a sprawling garden. Napa cabbage, with its mild flavor and crisp texture, is a fantastic addition to stir-fries, salads, and slaws. Plus, growing it yourself means you get the freshest, most delicious cabbage possible! Let’s dive in!
Choosing the Right Container and Soil
Before we get our hands dirty, let’s talk about the essentials: the container and the soil. These are crucial for a happy and healthy Napa cabbage.
* Container Size: Napa cabbage needs room to grow. I recommend a container that’s at least 12 inches in diameter and 12 inches deep. A 5-gallon bucket or a large planter works perfectly. Remember, bigger is generally better, as it gives the roots more space to spread out.
* Drainage: This is non-negotiable! Make sure your container has drainage holes. Napa cabbage hates sitting in soggy soil, which can lead to root rot. If your container doesn’t have drainage holes, you can easily drill some.
* Soil: Forget garden soil; it’s too heavy and compacts easily in containers. Instead, opt for a well-draining potting mix. I like to use a mix of compost, peat moss (or coconut coir), and perlite. This combination provides nutrients, retains moisture, and ensures good drainage. You can also buy pre-mixed potting soil specifically formulated for vegetables.
Planting Your Napa Cabbage
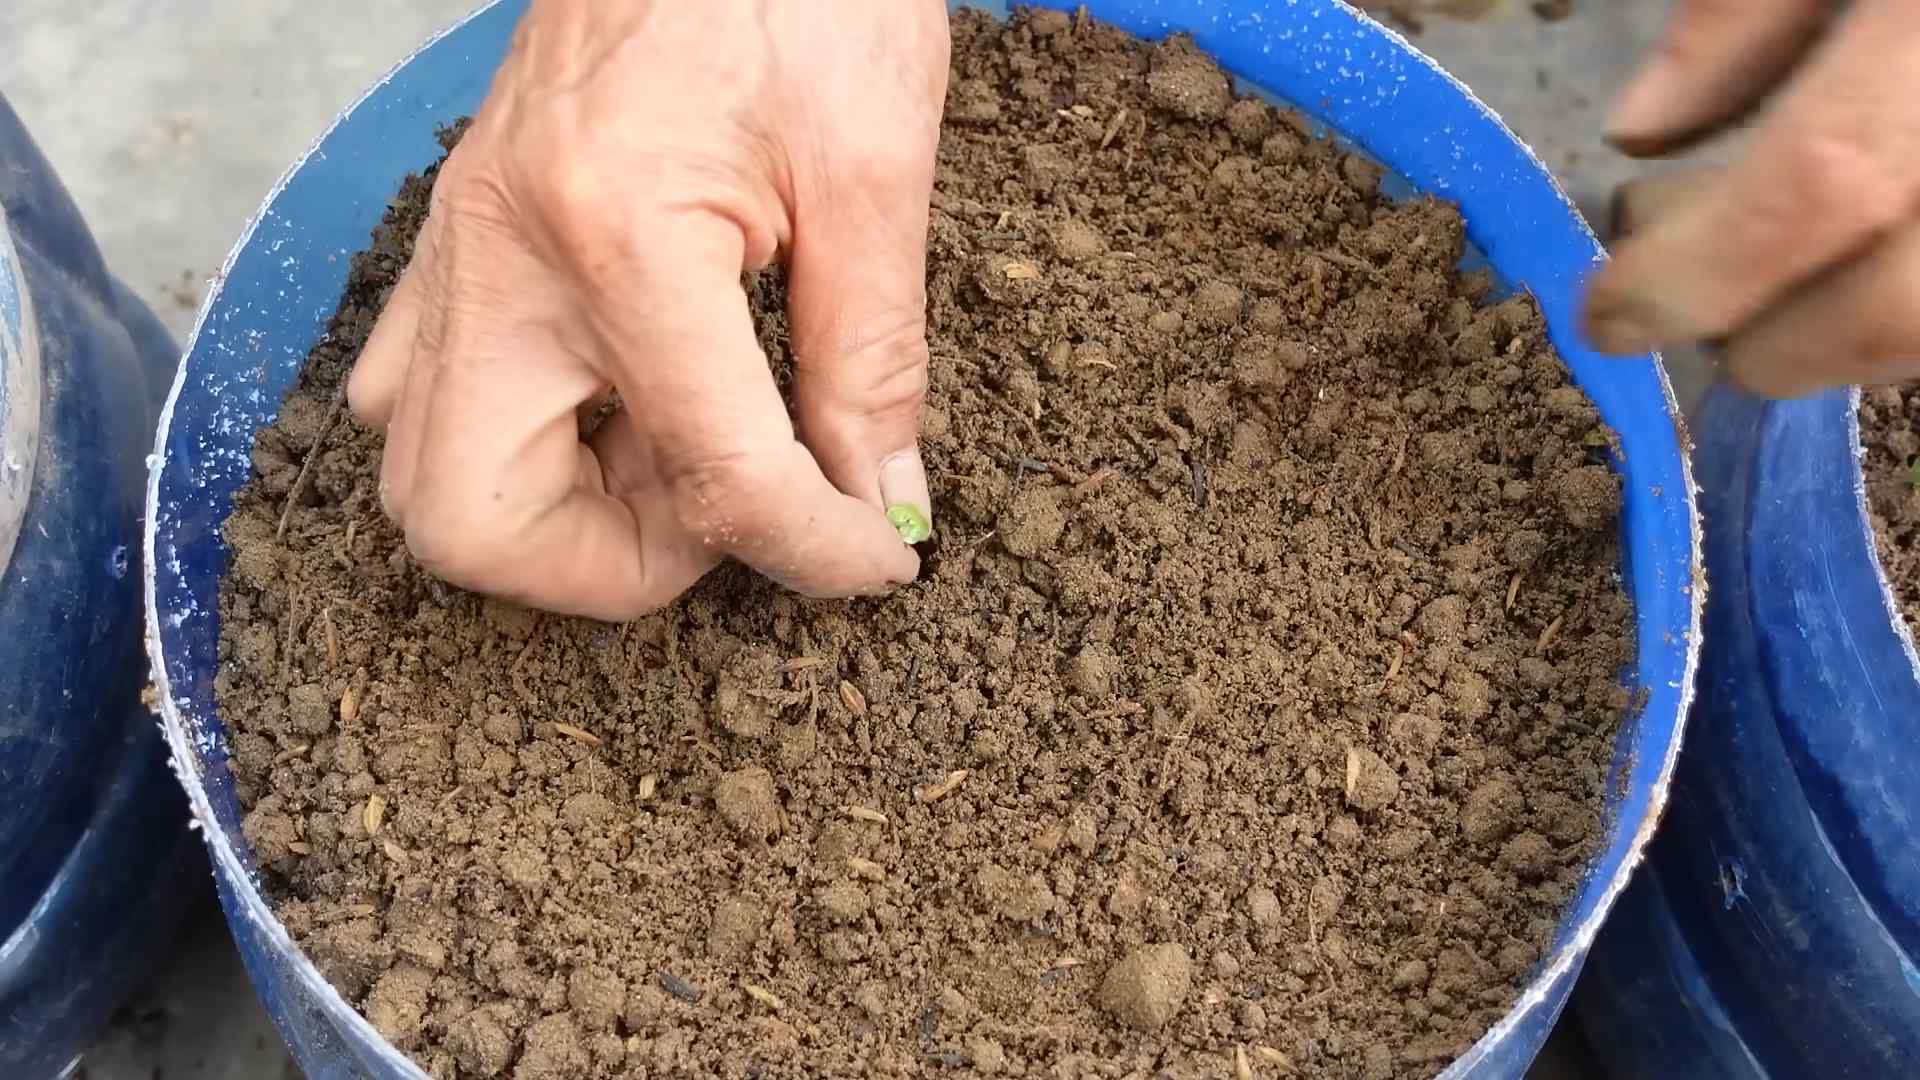
Now for the fun part: planting! You can start Napa cabbage from seeds or purchase seedlings from your local nursery. I’ve done both, and honestly, seedlings are a bit easier, especially if you’re a beginner.
* Starting from Seeds: If you’re starting from seeds, sow them indoors about 4-6 weeks before the last expected frost. Plant the seeds about ¼ inch deep in seed-starting trays or small pots filled with seed-starting mix. Keep the soil moist and warm (around 70-75°F). Once the seedlings have a few true leaves, you can transplant them into larger containers.
* Planting Seedlings: This is the method I usually prefer. Dig a hole in the center of your container that’s large enough to accommodate the seedling’s root ball. Gently remove the seedling from its container and loosen the roots a bit. Place the seedling in the hole and backfill with potting mix. Water thoroughly.
Step-by-Step Planting Instructions:
1. Prepare the Container: Fill your chosen container with the well-draining potting mix, leaving about an inch or two of space at the top.
2. Create a Planting Hole: Dig a hole in the center of the container, deep enough to accommodate the root ball of your seedling.
3. Remove the Seedling: Gently remove the Napa cabbage seedling from its nursery pot. If the roots are tightly bound, carefully loosen them with your fingers.
4. Plant the Seedling: Place the seedling in the hole, ensuring that the top of the root ball is level with the surrounding soil.
5. Backfill with Soil: Fill the hole with potting mix, gently pressing down to secure the seedling.
6. Water Thoroughly: Water the newly planted Napa cabbage thoroughly until water drains out of the bottom of the container. This helps settle the soil and encourages root growth.
7. Mulch (Optional): Add a layer of mulch around the base of the plant to help retain moisture and suppress weeds. Straw or shredded leaves work well.
Caring for Your Napa Cabbage
Once your Napa cabbage is planted, it’s time to provide the care it needs to thrive. This includes watering, fertilizing, and protecting it from pests.
* Watering: Napa cabbage needs consistent moisture, especially during hot weather. Water deeply whenever the top inch of soil feels dry to the touch. Avoid overwatering, as this can lead to root rot. I usually check the soil moisture every day or two.
* Fertilizing: Napa cabbage is a heavy feeder, so regular fertilization is essential. Use a balanced fertilizer (like 10-10-10) every 2-3 weeks. You can also use organic fertilizers like compost tea or fish emulsion. Follow the instructions on the fertilizer package.
* Sunlight: Napa cabbage needs at least 6 hours of sunlight per day. Place your container in a sunny location. If you live in a hot climate, provide some afternoon shade to prevent the leaves from scorching.
* Pest Control: Keep an eye out for common cabbage pests like cabbage worms, aphids, and flea beetles. I like to use organic pest control methods like handpicking the pests off the plants, spraying with insecticidal soap, or using diatomaceous earth. You can also cover your plants with row covers to prevent pests from reaching them.
Detailed Care Tips:
1. Consistent Watering is Key: Napa cabbage thrives on consistent moisture. Check the soil moisture daily, especially during hot and dry periods. Water deeply whenever the top inch of soil feels dry. Avoid letting the soil dry out completely, as this can stress the plant and affect its growth.
2. Fertilize Regularly: Napa cabbage is a heavy feeder and requires regular fertilization to produce a large, healthy head. Use a balanced fertilizer (such as 10-10-10) every 2-3 weeks. Alternatively, you can use organic fertilizers like compost tea or fish emulsion. Follow the instructions on the fertilizer package carefully.
3. Provide Adequate Sunlight: Napa cabbage needs at least 6 hours of direct sunlight per day to thrive. Place your container in a sunny location where it will receive ample sunlight throughout the day. If you live in a hot climate, consider providing some afternoon shade to protect the leaves from scorching.
4. Monitor for Pests: Regularly inspect your Napa cabbage plants for signs of pests, such as cabbage worms, aphids, and flea beetles. These pests can damage the leaves and stunt the plant’s growth. Take action promptly to control pests using organic methods like handpicking, insecticidal soap, or diatomaceous earth.
5. Protect from Extreme Temperatures: Napa cabbage prefers cool weather and can tolerate light frost. However, extreme temperatures can negatively impact its growth. If you experience a sudden cold snap, protect your plants by covering them with a blanket or moving them indoors temporarily. Similarly, during periods of intense heat, provide shade to prevent the leaves from scorching.
6. Weed Regularly: Keep the container free of weeds, as they can compete with the Napa cabbage for nutrients and water. Hand-pull any weeds that appear, being careful not to disturb the roots of the cabbage plant.
7. Rotate Your Crops: If you grow Napa cabbage in containers year after year, consider rotating your crops to prevent soilborne diseases from building up. Plant different types of vegetables in the same container each year to maintain soil health.
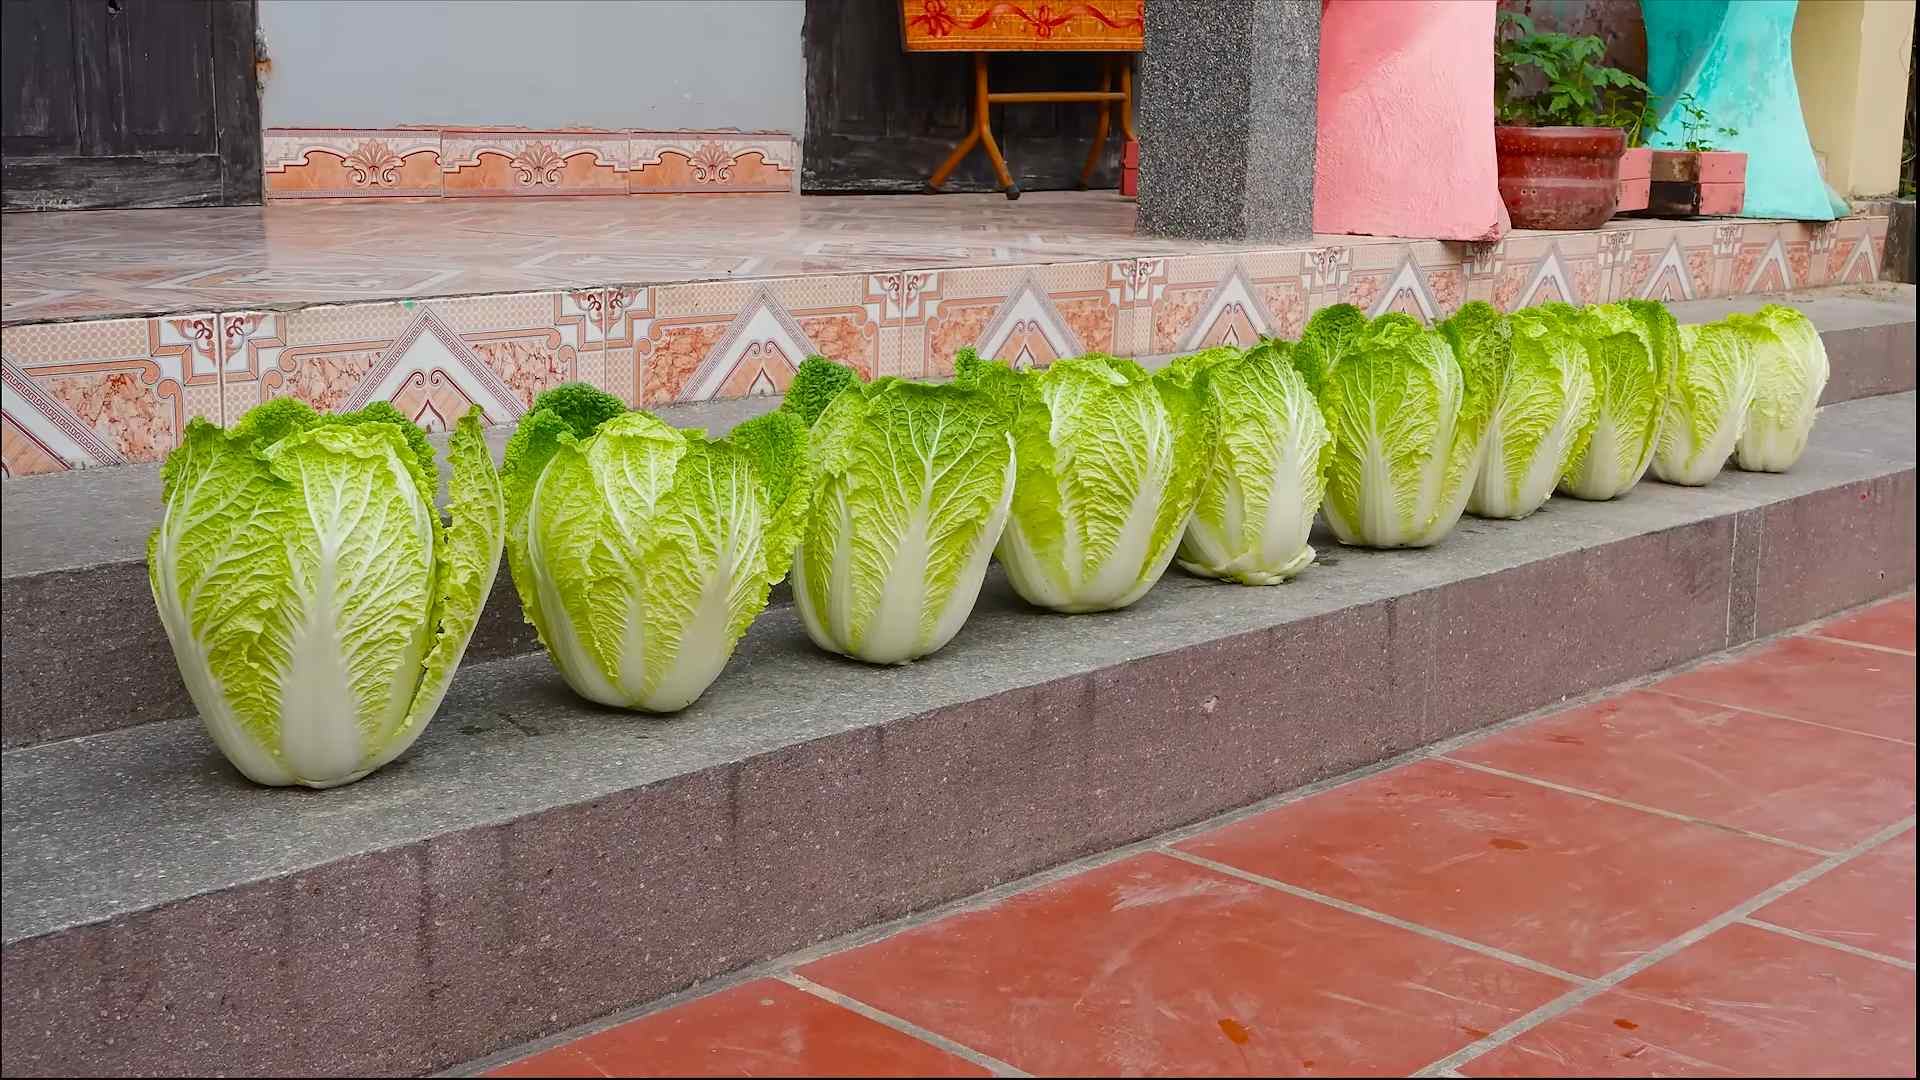
Harvesting Your Napa Cabbage
The moment we’ve all been waiting for: harvesting! Napa cabbage is usually ready to harvest in about 70-80 days from planting.
* When to Harvest: The head should be firm and compact. Gently squeeze the head; if it feels solid, it’s ready to harvest. The size of the head will vary depending on the variety and growing conditions.
* How to Harvest: Use a sharp knife to cut the head off at the base of the plant. Leave a few outer leaves on the plant, as they can sometimes produce smaller side shoots.
Harvesting Tips:
1. Check for Firmness: The most reliable way to determine if your Napa cabbage is ready for harvest is to check its firmness. Gently squeeze the head; if it feels solid and compact, it’s likely ready to be harvested.
2. Consider the Size: While the size of the head can vary depending on the variety and growing conditions, a mature Napa cabbage head typically weighs between 2 and 4 pounds. If your cabbage head has reached a reasonable size and feels firm, it’s probably ready to harvest.
3. Look for a Tight Head: A mature Napa cabbage head should be tightly packed with leaves. If the leaves are loose and the head feels soft, it may not be fully mature yet.
4. Use a Sharp Knife: When harvesting your Napa cabbage, use a sharp knife to cut the head off at the base of the plant. Make a clean cut to minimize damage to the remaining plant.
5. Leave Some Outer Leaves: After harvesting the main head, leave a few outer leaves on the plant. These leaves may produce smaller side shoots that you can harvest later.
6. Harvest in the Morning: The best time to harvest Napa cabbage is in the morning, when the leaves are crisp and cool. Avoid harvesting during the heat of the day, as the leaves may be wilted and less flavorful.
7. Store Properly: After harvesting, store your Napa cabbage in the refrigerator to
Conclusion
So, there you have it! Growing your own Napa cabbage in containers is not only achievable, but it’s also incredibly rewarding. We’ve walked you through the entire process, from selecting the right container and soil to nurturing your cabbage plants and harvesting your bounty. But why should you bother with this DIY project?
Simply put, fresh, homegrown Napa cabbage offers a flavor and texture that you just can’t find in store-bought varieties. Imagine the crisp, slightly sweet leaves adding a delightful crunch to your salads, stir-fries, and kimchi. Plus, knowing that you cultivated this delicious vegetable yourself adds a special sense of accomplishment to every meal.
Beyond the superior taste, container gardening Napa cabbage gives you complete control over the growing environment. You can ensure your plants receive the optimal amount of sunlight, water, and nutrients, minimizing the risk of pests and diseases. This is especially beneficial if you live in an area with poor soil quality or limited garden space.
But the benefits don’t stop there! Container gardening is also a fantastic way to extend your growing season. By moving your containers indoors or to a sheltered location during colder months, you can enjoy fresh Napa cabbage for a longer period.
Feeling adventurous? Consider these variations to spice up your Napa cabbage container gardening experience:
* Succession Planting: Plant new seeds every few weeks to ensure a continuous harvest throughout the growing season.
* Companion Planting: Plant herbs like dill or chamomile alongside your Napa cabbage to deter pests and attract beneficial insects. Marigolds are also a great choice!
* Different Varieties: Experiment with different varieties of Napa cabbage, such as ‘Blues’ or ‘Optiko’, to discover your favorite flavor and texture.
* Vertical Gardening: If space is truly limited, explore vertical gardening options using stacked planters or hanging baskets.
Ultimately, growing Napa cabbage in containers is a must-try for any gardening enthusiast, regardless of their experience level. It’s a simple, satisfying, and delicious way to connect with nature and enjoy the fruits (or rather, vegetables) of your labor.
Don’t be intimidated by the prospect of starting your own container garden. With a little planning and effort, you can easily grow a thriving crop of Napa cabbage right on your patio, balcony, or even windowsill.
We encourage you to give this DIY trick a try and experience the joy of harvesting your own fresh, flavorful Napa cabbage. And most importantly, we want to hear about your experiences! Share your tips, tricks, and photos with us in the comments below. Let’s build a community of Napa cabbage container gardening enthusiasts! Happy gardening!
Frequently Asked Questions (FAQ)
What is the best size container for growing Napa cabbage?
A container that is at least 12 inches in diameter and 12 inches deep is generally recommended for growing Napa cabbage. This provides enough space for the roots to develop properly and allows the plant to grow to its full size. Larger containers, such as those that are 18 inches or more in diameter, are even better, as they provide more room for the roots and help to retain moisture. Make sure the container has drainage holes to prevent waterlogging.
What type of soil is best for container gardening Napa cabbage?
Napa cabbage thrives in well-draining, fertile soil that is rich in organic matter. A good potting mix specifically formulated for vegetables is an excellent choice. You can also create your own mix by combining equal parts of compost, peat moss (or coconut coir), and perlite or vermiculite. The compost provides essential nutrients, while the peat moss or coconut coir helps to retain moisture, and the perlite or vermiculite improves drainage. Avoid using garden soil in containers, as it can become compacted and prevent proper drainage.
How much sunlight does Napa cabbage need?
Napa cabbage requires at least 6 hours of direct sunlight per day to grow properly. Choose a location for your container garden that receives ample sunlight throughout the day. If you live in a particularly hot climate, you may need to provide some afternoon shade to prevent the leaves from scorching. If you don’t have access to enough natural sunlight, you can supplement with grow lights.
How often should I water my container-grown Napa cabbage?
Water your Napa cabbage regularly, especially during hot, dry weather. The soil should be kept consistently moist, but not waterlogged. Check the soil moisture by sticking your finger about an inch deep into the soil. If it feels dry, it’s time to water. Water deeply, until water drains out of the drainage holes in the bottom of the container. Avoid watering the leaves directly, as this can promote fungal diseases.
What are some common pests and diseases that affect Napa cabbage?
Common pests that can affect Napa cabbage include aphids, cabbage worms, flea beetles, and slugs. Diseases include clubroot, black rot, and downy mildew. Regularly inspect your plants for signs of pests or diseases. You can control pests by handpicking them off the plants, using insecticidal soap, or introducing beneficial insects like ladybugs. Prevent diseases by providing good air circulation, avoiding overhead watering, and using disease-resistant varieties.
How do I fertilize my container-grown Napa cabbage?
Napa cabbage is a heavy feeder and requires regular fertilization to grow properly. Use a balanced fertilizer, such as a 10-10-10 or 14-14-14, according to the package directions. You can also use organic fertilizers, such as compost tea or fish emulsion. Fertilize every 2-3 weeks during the growing season.
When is the best time to harvest Napa cabbage?
Napa cabbage is typically ready to harvest 70-80 days after planting. The head should be firm and compact. To harvest, cut the head off at the base with a sharp knife. You can also harvest individual leaves as needed.
Can I grow Napa cabbage in containers indoors?
Yes, you can grow Napa cabbage in containers indoors, but you will need to provide adequate light. Use grow lights to supplement natural sunlight. You will also need to ensure good air circulation and maintain a consistent temperature.
What are some good companion plants for Napa cabbage?
Good companion plants for Napa cabbage include dill, chamomile, marigolds, rosemary, and thyme. These plants can help to deter pests and attract beneficial insects. Avoid planting Napa cabbage near other members of the brassica family, such as broccoli, cauliflower, and kale, as they can attract the same pests and diseases.
How do I prevent my Napa cabbage from bolting (going to seed)?
Bolting is when a plant prematurely flowers and goes to seed. This can happen when Napa cabbage is exposed to stress, such as high temperatures or drought. To prevent bolting, keep the soil consistently moist, provide some afternoon shade during hot weather, and choose bolt-resistant varieties.

Leave a Comment