

Oven Cleaner Uses Hacks: Who knew that the grime-fighting power of your oven cleaner could extend far beyond the kitchen? I’m always on the lookout for clever DIY solutions around the house, and I was absolutely blown away by the sheer versatility of this common household product. Forget spending a fortune on specialized cleaners – you probably already have the answer sitting in your pantry!
For generations, we’ve relied on elbow grease and harsh chemicals to tackle tough cleaning jobs. But what if I told you there’s a simpler, more efficient way? This article is packed with surprising oven cleaner uses hacks that will save you time, money, and a whole lot of scrubbing. From restoring your outdoor furniture to tackling stubborn stains on your car tires, the possibilities are truly endless.
Why do you need these DIY tricks? Because life’s too short to spend hours battling grime! These hacks are designed to simplify your cleaning routine, allowing you to reclaim your weekends and enjoy the things you truly love. Plus, you’ll be amazed at how effectively oven cleaner can tackle problems you never thought possible. So, grab your gloves, and let’s dive into the world of unexpected cleaning solutions!

Unlocking the Power of Oven Cleaner: Surprising DIY Hacks You Need to Know
Okay, let’s be honest, oven cleaner isn’t exactly the first thing that springs to mind when you think “versatile cleaning product.” But trust me, this stuff is a hidden gem! I’ve discovered some seriously amazing DIY hacks using oven cleaner that go way beyond just scrubbing burnt food off your oven racks. I’m going to share my secrets with you, but remember, safety first! Always wear gloves and eye protection when working with oven cleaner, and work in a well-ventilated area.
Cleaning Stubborn Stains on Your Oven Door
That baked-on grime on your oven door can be a real pain. But don’t despair! Oven cleaner can make it look brand new.
What You’ll Need:
* Oven cleaner (I prefer the fume-free kind)
* Gloves
* Eye protection
* Paper towels or a clean cloth
* Warm water
* Scrub brush (optional, for really tough spots)
Step-by-Step Instructions:
1. Prep the Area: Lay down some old newspapers or a drop cloth around your oven to protect your floors. I always do this because oven cleaner can be a bit messy.
2. Apply the Oven Cleaner: Generously spray the oven cleaner onto the inside of your oven door, focusing on the areas with the most baked-on grime. Make sure you cover the entire surface you want to clean.
3. Let it Sit: This is the crucial part. Let the oven cleaner sit for the recommended time on the can. Usually, it’s around 20-30 minutes, but check the instructions on your specific product. The longer it sits, the better it will work.
4. Wipe Away the Grime: After the waiting period, grab your paper towels or a clean cloth and start wiping away the oven cleaner. You’ll be amazed at how easily the grime comes off! For really stubborn spots, use a scrub brush to gently scrub the area.
5. Rinse Thoroughly: Once you’ve removed all the oven cleaner and grime, rinse the area thoroughly with warm water. This is important to remove any residue.
6. Dry and Admire: Finally, dry the oven door with a clean cloth. Step back and admire your sparkling clean oven door!
Reviving Your Grout: A Grout Cleaning Miracle
Dirty grout can make your entire bathroom or kitchen look dingy. I’ve found that oven cleaner is a fantastic way to bring your grout back to life.
What You’ll Need:
* Oven cleaner
* Gloves
* Eye protection
* Old toothbrush or grout brush
* Warm water
* Sponge or cloth
Step-by-Step Instructions:
1. Protect the Surrounding Area: Just like with the oven door, protect any surrounding surfaces from overspray. I usually use painter’s tape to mask off the tiles next to the grout lines.
2. Apply the Oven Cleaner: Carefully spray the oven cleaner directly onto the grout lines. Try to avoid getting it on the tiles themselves, but if you do, wipe it off quickly.
3. Let it Sit (Briefly!): This is important: don’t let the oven cleaner sit on the grout for too long. I usually give it about 5-10 minutes. You don’t want to damage the grout.
4. Scrub the Grout: Using an old toothbrush or a grout brush, scrub the grout lines thoroughly. You’ll see the dirt and grime start to lift away.
5. Rinse Thoroughly: Rinse the grout lines with warm water, making sure to remove all traces of the oven cleaner.
6. Wipe Clean: Use a sponge or cloth to wipe the tiles and grout clean. You might need to rinse and wipe a few times to get rid of all the residue.
7. Repeat if Necessary: For really stubborn grout, you might need to repeat the process. But be careful not to overdo it, as oven cleaner can be harsh.
Cleaning Burnt Pots and Pans: Say Goodbye to Scrubbing!
Burnt food stuck to the bottom of your pots and pans? I’ve been there! Oven cleaner can save you hours of scrubbing.
What You’ll Need:
* Oven cleaner
* Gloves
* Eye protection
* Large plastic bag (big enough to fit the pot or pan)
* Warm water
* Sponge or scrub brush
Step-by-Step Instructions:
1. Place the Pot/Pan in a Bag: Put the burnt pot or pan inside the large plastic bag. This will contain the fumes and prevent the oven cleaner from getting everywhere.
2. Spray with Oven Cleaner: Generously spray the burnt areas of the pot or pan with oven cleaner. Make sure you cover all the affected areas.
3. Seal the Bag: Seal the plastic bag tightly. This will help the oven cleaner work its magic.
4. Let it Sit: Let the pot or pan sit in the sealed bag for at least a few hours, or even overnight for really stubborn burns.
5. Remove and Rinse: Carefully remove the pot or pan from the bag (wearing gloves, of course!). Rinse it thoroughly with warm water.
6. Scrub (Lightly!): You should find that the burnt food comes off easily with a sponge or scrub brush. You might need to scrub a little, but it will be nothing compared to what you would have had to do without the oven cleaner.
7. Wash as Usual: Wash the pot or pan as you normally would with soap and water.
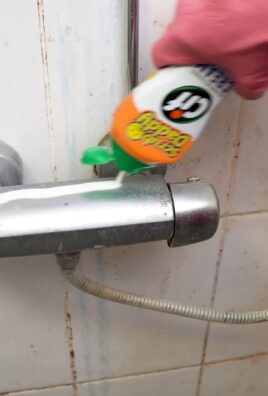
Removing Rust from Chrome: Restore the Shine
Rust on chrome fixtures can be unsightly. I’ve found that oven cleaner can help remove rust and restore the shine.
What You’ll Need:
* Oven cleaner
* Gloves
* Eye protection
* Clean cloth or sponge
* Warm water
* Chrome polish (optional)
Step-by-Step Instructions:
1. Apply the Oven Cleaner: Spray the oven cleaner onto the rusted areas of the chrome fixture.
2. Let it Sit: Let the oven cleaner sit for about 10-15 minutes.
3. Wipe Away the Rust: Using a clean cloth or sponge, wipe away the oven cleaner and the rust. You might need to scrub a little, but the rust should come off fairly easily.
4. Rinse Thoroughly: Rinse the chrome fixture thoroughly with warm water to remove any residue.
5. Dry and Polish: Dry the fixture with a clean cloth. For extra shine, you can apply a chrome polish according to the manufacturer’s instructions.
Cleaning Your BBQ Grill Grates: Get Ready for Grilling Season!
Cleaning BBQ grill grates is a chore, but oven cleaner makes it much easier.
What You’ll Need:
* Oven cleaner
* Gloves
* Eye protection
* Large garbage bag
* Warm water
* Scrub brush or steel wool
Step-by-Step Instructions:
1. Place Grates in a Bag: Put the grill grates inside the large garbage bag.
2. Spray with Oven Cleaner: Generously spray the grates with oven cleaner, making sure to cover all the greasy and burnt areas.
3. Seal the Bag: Seal the garbage bag tightly.
4. Let it Sit: Let the grates sit in the sealed bag overnight.
5. Remove and Rinse: Carefully remove the grates from the bag (wearing gloves!). Rinse them thoroughly with warm water.
6. Scrub: Use a scrub brush or steel wool to scrub away any remaining grease and grime. It should come off easily.
7. Wash and Dry: Wash the grates with soap and water, then dry them thoroughly before putting them back on the grill.
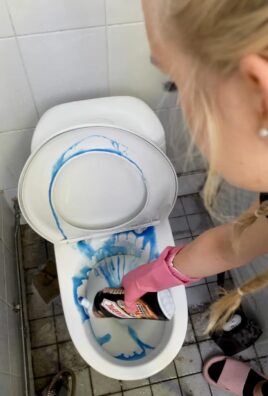
Removing Soap Scum from Shower Doors: Sparkling Clean in Minutes
Soap scum on shower doors can be a real eyesore. Oven cleaner can cut through the soap scum and leave your shower doors sparkling clean.
What You’ll Need:
* Oven cleaner
* Gloves
* Eye protection
* Sponge or cloth
* Warm water
* Squeegee (optional)
Step-by-Step Instructions:
1. Apply the Oven Cleaner: Spray the oven cleaner onto the shower doors, focusing on the areas with the most soap scum.
2. Let it Sit: Let the oven cleaner sit for about 5-10 minutes. Don’t let it sit too long, as it can damage the shower door.
3. Wipe Away the Soap Scum: Using a sponge or cloth, wipe away the oven cleaner and the soap scum.
4

Conclusion
So, there you have it! Unlocking the power of oven cleaner uses hacks is not just about saving money; it’s about reclaiming control over your cleaning routine and achieving sparkling results with a readily available product. We’ve explored how this potent cleaner can extend far beyond its intended purpose, tackling stubborn grime and stains in unexpected places. From revitalizing your grill grates to banishing soap scum in your shower, the versatility of oven cleaner is truly remarkable.
But why is this DIY approach a must-try? Simply put, it’s effective, efficient, and often more economical than purchasing specialized cleaning products for every single task. Imagine the satisfaction of transforming a grimy surface into a gleaming one with a single product you already have on hand. Plus, by understanding the chemical properties of oven cleaner and applying it safely and strategically, you’re empowering yourself to become a cleaning master.
Don’t be afraid to experiment! While we’ve covered a range of applications, the possibilities are truly endless. Consider these variations to tailor the hacks to your specific needs:
* For delicate surfaces: Dilute the oven cleaner with water to create a gentler solution. Always test in an inconspicuous area first.
* For extra stubborn stains: Allow the oven cleaner to dwell for a longer period, but never exceed the manufacturer’s recommended time.
* For vertical surfaces: Use a gel-based oven cleaner to prevent dripping and ensure even coverage.
* Scent Customization: After cleaning and rinsing, consider using a natural essential oil spray (like lemon or lavender) to leave a pleasant fragrance.
We understand that venturing into DIY cleaning can feel daunting at first. That’s why we’ve emphasized safety precautions throughout this guide. Always wear gloves and eye protection, work in a well-ventilated area, and thoroughly rinse surfaces after cleaning. Remember, a little caution goes a long way in ensuring a safe and successful cleaning experience.
Now, it’s your turn! We wholeheartedly encourage you to try these oven cleaner uses hacks and discover the transformative power of this often-overlooked cleaning agent. We’re confident that you’ll be amazed by the results. But more importantly, we want to hear about your experiences! Share your success stories, challenges, and any variations you’ve discovered in the comments below. Your insights will not only inspire other readers but also contribute to a collective knowledge base of DIY cleaning wisdom. Let’s unlock the full potential of oven cleaner together and create a cleaner, brighter, and more sustainable home. So, grab your gloves, your oven cleaner, and get ready to be amazed! We can’t wait to hear what you discover!
Frequently Asked Questions (FAQ)
Is it safe to use oven cleaner on all surfaces?
No, it’s crucial to understand that oven cleaner is a powerful chemical and should not be used on all surfaces. Avoid using it on aluminum, painted surfaces, plastic, linoleum, fiberglass, or any surface that is sensitive to strong alkaline solutions. Always test in an inconspicuous area first to ensure it doesn’t cause discoloration or damage. When in doubt, consult the manufacturer’s instructions for both the oven cleaner and the surface you intend to clean. Using oven cleaner on incompatible surfaces can lead to irreversible damage.
What safety precautions should I take when using oven cleaner?
Safety is paramount when working with oven cleaner. Always wear gloves and eye protection to prevent skin and eye irritation. Work in a well-ventilated area to avoid inhaling fumes. Avoid direct contact with skin and eyes. If contact occurs, rinse immediately with plenty of water and seek medical attention. Keep oven cleaner out of reach of children and pets. Never mix oven cleaner with other cleaning products, as this can create dangerous fumes. Thoroughly rinse all surfaces after cleaning to remove any residue.
Can I use oven cleaner to clean my stainless steel appliances?
While some people have successfully used oven cleaner on stainless steel, it’s generally not recommended due to the risk of discoloration or damage. If you choose to try it, dilute the oven cleaner significantly with water and test in a very small, inconspicuous area first. Apply the solution briefly, then rinse thoroughly with water and dry immediately. If you notice any discoloration or etching, discontinue use immediately. There are many stainless steel-specific cleaners available that are safer and more effective.
How long should I leave oven cleaner on a surface?
The dwell time for oven cleaner depends on the severity of the grime and the type of surface. Always follow the manufacturer’s instructions on the oven cleaner can. In general, avoid leaving oven cleaner on for extended periods, as this can increase the risk of damage. For most applications, a dwell time of 15-30 minutes is sufficient. For heavily soiled areas, you may need to repeat the application. Never exceed the maximum dwell time recommended by the manufacturer.
What’s the best way to remove oven cleaner residue?
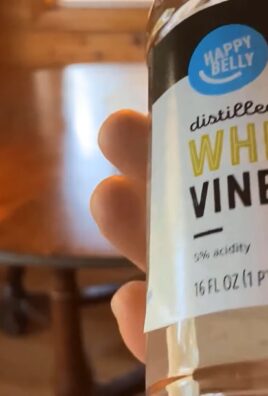
Thorough rinsing is essential to remove oven cleaner residue. Use plenty of clean water and a sponge or cloth to wipe down the surface multiple times. For porous surfaces, consider using a pressure washer to ensure complete removal. After rinsing, dry the surface with a clean towel to prevent water spots. If you’re concerned about lingering residue, you can wipe the surface down with a solution of vinegar and water (1:1 ratio) to neutralize any remaining alkalinity.
Can I use oven cleaner to clean my grill grates?
Yes, oven cleaner can be very effective for cleaning grill grates. Remove the grates from the grill and place them on a protected surface, such as a tarp or old newspapers. Spray the grates with oven cleaner, ensuring even coverage. Allow the cleaner to dwell for the recommended time, then scrub the grates with a wire brush. Rinse thoroughly with water and dry before replacing them in the grill. Before cooking, preheat the grill to burn off any remaining residue.
Is there a more eco-friendly alternative to oven cleaner?
Yes, several eco-friendly alternatives to oven cleaner are available. A paste made from baking soda and water is a popular option. Apply the paste to the surface, let it sit for several hours or overnight, then scrub and rinse. Vinegar and lemon juice are also effective for removing grease and grime. For tougher stains, consider using a commercial eco-friendly oven cleaner. These products typically contain plant-based ingredients and are less harsh than traditional oven cleaners.
What do I do if I accidentally get oven cleaner on my skin or in my eyes?
If oven cleaner comes into contact with your skin, rinse immediately with plenty of water for at least 15 minutes. If irritation persists, seek medical attention. If oven cleaner gets into your eyes, flush immediately with cool water for at least 20 minutes, holding your eyelids open. Seek immediate medical attention. Do not rub your eyes, as this can worsen the irritation. Bring the oven cleaner container with you to the doctor so they can identify the ingredients.
Can I use oven cleaner to remove rust?
Yes, oven cleaner can be effective for removing rust from some metal surfaces. However, it’s important to test in an inconspicuous area first, as oven cleaner can damage certain metals. Apply the oven cleaner to the rusted area, let it sit for the recommended time, then scrub with a wire brush. Rinse thoroughly with water and dry. For heavy rust, you may need to repeat the application. After removing the rust, consider applying a rust-preventative coating to protect the surface.
How do I dispose of leftover oven cleaner safely?
Do not pour leftover oven cleaner down the drain, as it can damage plumbing and contaminate water sources. Check your local regulations for proper disposal methods. Many communities have hazardous waste collection programs where you can safely dispose of oven cleaner and other household chemicals. You can also contact your local waste management company for guidance. If you must dispose of it yourself, pour the oven cleaner onto absorbent material, such as kitty litter or newspaper, and seal it in a container before disposing of it in the trash.
Leave a Comment