

Small Planter Watermelon: Dreaming of juicy, homegrown watermelon but think you don’t have the space? Think again! I’m here to let you in on a little secret: you absolutely CAN grow delicious watermelons, even in a small planter. Forget sprawling vines taking over your entire yard; this DIY guide will show you how to cultivate these summer favorites in a compact and manageable way.
Watermelons have a rich history, dating back thousands of years to Africa. They were even found in King Tut’s tomb! For centuries, they’ve been a symbol of summer refreshment and a staple at picnics and gatherings. But traditionally, growing them required a lot of space, making them inaccessible to many urban gardeners.
That’s where this DIY trick comes in! Many people are intimidated by the thought of growing watermelons, believing it’s too difficult or requires too much land. But with the right techniques and a little know-how, you can enjoy the sweet taste of homegrown small planter watermelon, no matter how limited your gardening space. I’ll guide you through selecting the right variety, preparing your planter, and providing the care your watermelon needs to thrive. Get ready to impress your friends and family with your green thumb and enjoy the satisfaction of harvesting your own delicious watermelons!
DIY: Growing Watermelons in Small Planters – A Beginner’s Guide
Hey there, fellow gardening enthusiasts! Ever dreamt of biting into a juicy, homegrown watermelon but thought you didn’t have the space? Well, I’m here to tell you that you absolutely can grow watermelons, even in small planters! It’s a fun and rewarding project, and I’m going to walk you through every step. Don’t worry if you’re a beginner; I’ll keep it simple and straightforward.
Choosing the Right Watermelon Variety
First things first, not all watermelons are created equal when it comes to container gardening. You’ll want to choose a bush or dwarf variety that’s specifically bred for smaller spaces. These varieties produce smaller fruits and have a more compact growth habit.
Here are a few of my favorite bush watermelon varieties perfect for small planters:
* Bush Sugar Baby: This is a classic choice! It produces small, round watermelons that are incredibly sweet and perfect for a single serving. They mature quickly, which is a bonus.
* Bush Jubilee: Similar to Sugar Baby, but with slightly larger fruits. Still manageable in a container, and the flavor is fantastic.
* Golden Midget: A unique variety that turns golden yellow when ripe. The fruits are small and sweet, and they add a pop of color to your garden.
* Tiger Baby: A smaller, striped watermelon that is perfect for growing in containers. It has a sweet, crisp flavor.
When selecting your seeds, make sure to check the seed packet for information on plant size and fruit size. This will help you choose a variety that’s well-suited for your container.
Gathering Your Supplies
Okay, now that we’ve picked our watermelon variety, let’s gather everything we need. Here’s a checklist:
* A large planter: This is crucial! You’ll need a container that’s at least 24 inches in diameter and 18 inches deep. Watermelons have extensive root systems, so the bigger, the better. A half wine barrel or a large resin container works great.
* High-quality potting mix: Don’t skimp on this! Use a well-draining potting mix that’s rich in organic matter. Avoid using garden soil, as it can compact and hinder drainage.
* Watermelon seeds: Of course! Choose your favorite bush variety.
* Slow-release fertilizer: This will provide your watermelon plant with a steady supply of nutrients throughout the growing season. Look for a fertilizer that’s specifically formulated for vegetables or fruits.
* Trellis or support: Even bush varieties can benefit from some support, especially as the fruits start to develop. A small trellis or tomato cage will do the trick.
* Watering can or hose: You’ll need to water your watermelon plant regularly, especially during hot weather.
* Mulch: This will help retain moisture in the soil and suppress weeds. Straw, wood chips, or shredded bark are all good options.
* Gardening gloves: To keep your hands clean and protected.
* Optional: A soil moisture meter can be helpful to ensure you’re not over- or under-watering.
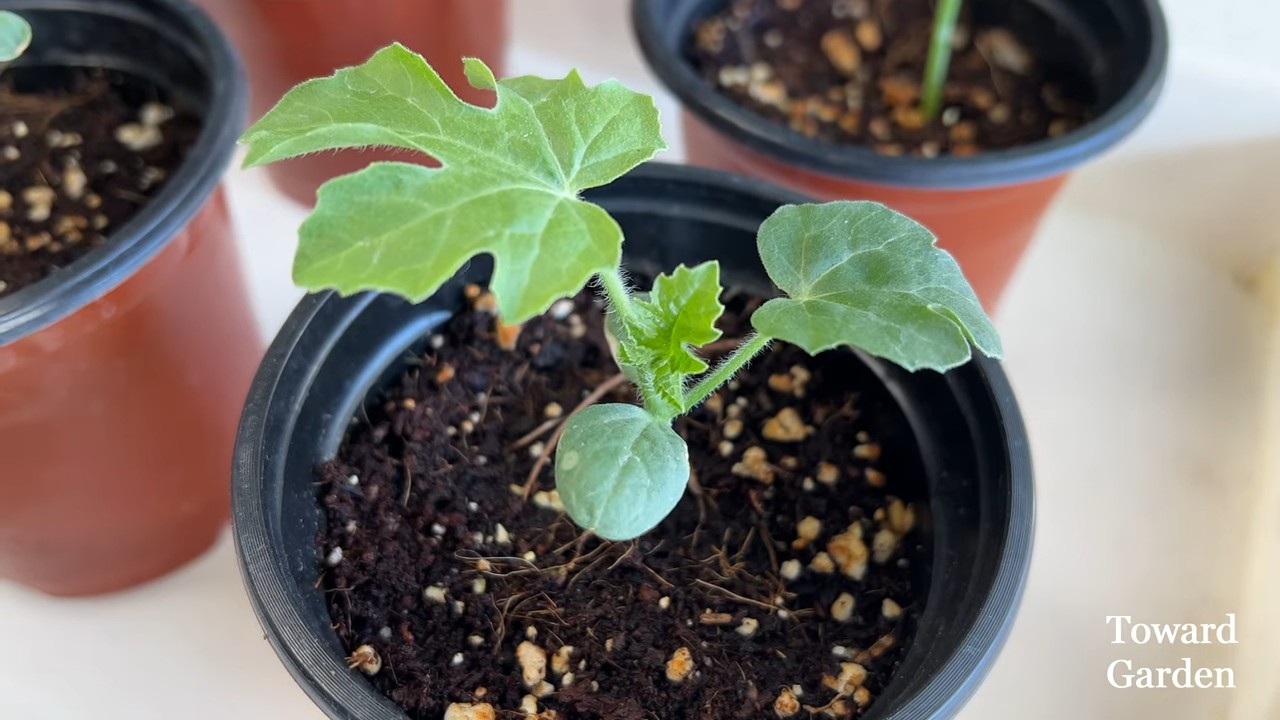
Planting Your Watermelon Seeds
Now for the fun part – planting!
1. Prepare the planter: Fill your planter with the high-quality potting mix, leaving a few inches of space at the top.
2. Sow the seeds: Plant 2-3 watermelon seeds about 1 inch deep in the center of the planter. Space them a few inches apart.
3. Water gently: Water the soil thoroughly, but be careful not to overwater. You want the soil to be moist, but not soggy.
4. Provide warmth: Watermelons need warm temperatures to germinate. If you’re starting your seeds indoors, place the planter in a warm, sunny location or use a heat mat. If you’re planting directly outdoors, wait until the soil temperature is consistently above 70°F (21°C).
5. Wait for germination: Watermelon seeds typically germinate within 7-10 days. Keep the soil consistently moist during this time.
Caring for Your Watermelon Plant
Once your watermelon seedlings emerge, it’s time to start caring for them. Here’s what you need to do:
1. Thin the seedlings: Once the seedlings have developed a few true leaves, thin them to one plant per planter. Choose the strongest, healthiest-looking seedling and snip off the others at the soil line.
2. Water regularly: Watermelons need consistent moisture, especially during hot weather. Water deeply whenever the top inch of soil feels dry to the touch. Avoid overhead watering, as this can lead to fungal diseases.
3. Fertilize regularly: Feed your watermelon plant with a slow-release fertilizer according to the package directions. You can also supplement with a liquid fertilizer every few weeks.
4. Provide support: As the watermelon plant grows, it will start to vine. Provide it with a trellis or tomato cage to support the vines and fruits. This will help prevent the fruits from rotting on the ground.
5. Pollination: Watermelons need to be pollinated in order to produce fruit. If you’re growing your watermelon plant indoors or in an area with limited bee activity, you may need to hand-pollinate the flowers. To do this, use a small paintbrush to transfer pollen from the male flowers to the female flowers. The female flowers have a small, immature watermelon at the base.
6. Protect the fruits: As the watermelons start to develop, you may want to protect them from pests and diseases. You can use a floating row cover or wrap the fruits in cheesecloth.
7. Monitor for pests and diseases: Keep an eye out for common watermelon pests, such as aphids, squash bugs, and cucumber beetles. You can control these pests with insecticidal soap or neem oil. Also, watch out for fungal diseases, such as powdery mildew and anthracnose. You can prevent these diseases by providing good air circulation and avoiding overhead watering.
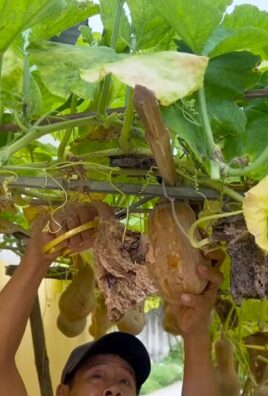
Harvesting Your Watermelon
The most exciting part – harvesting! Knowing when your watermelon is ripe can be a little tricky, but here are a few telltale signs:
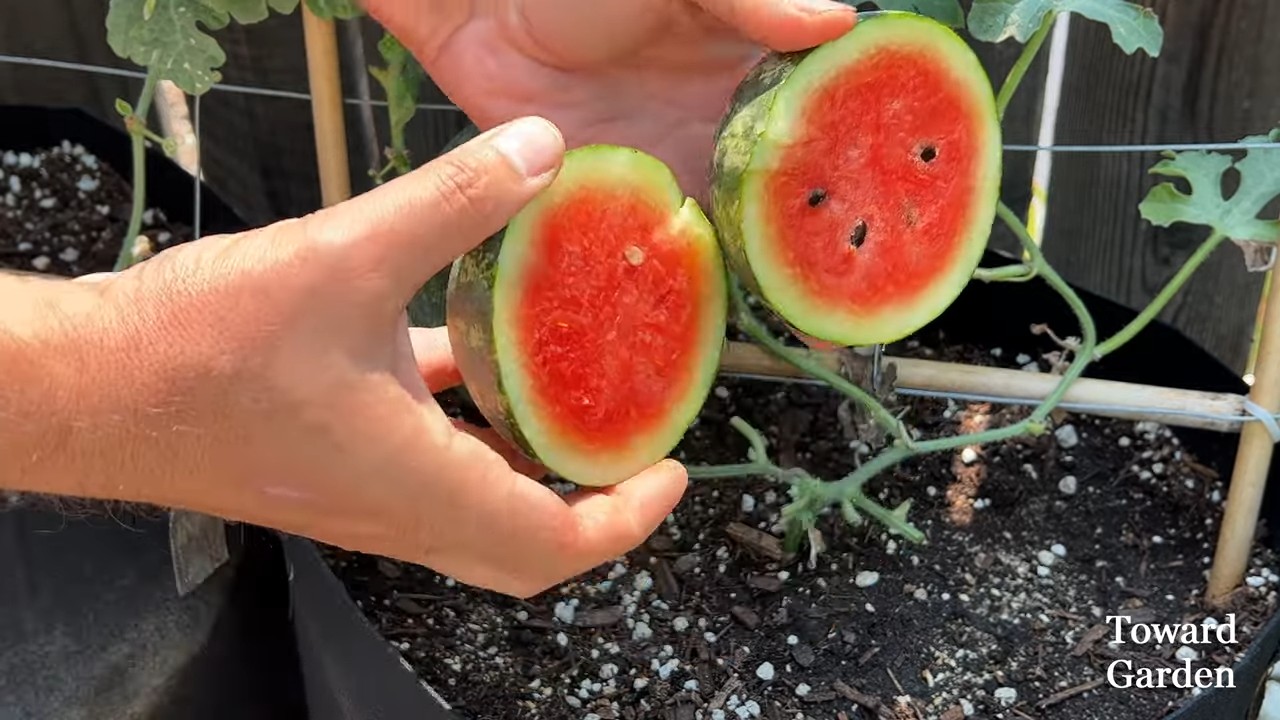
1. The tendril closest to the fruit turns brown and dries up: This is a reliable indicator that the watermelon is ripe.
2. The underside of the watermelon (where it rests on the ground) turns from white to yellow: This is another good sign that the watermelon is ready to be picked.
3. The watermelon sounds hollow when you thump it: This takes a little practice, but once you get the hang of it, it’s a great way to tell if a watermelon is ripe.
4. The watermelon is easy to detach from the vine: If the watermelon is ripe, it should come off the vine with a gentle tug.
Once you’ve determined that your watermelon is ripe, use a sharp knife to cut it from the vine, leaving a few inches of stem attached.
Troubleshooting
Even with the best care, you might encounter a few challenges along the way. Here are some common problems and how to fix them:
* Yellowing leaves: This could be a sign of overwatering, underwatering, or nutrient deficiency. Check the soil moisture and adjust your watering accordingly. Also, make sure you’re fertilizing your watermelon plant regularly.
* Lack of fruit: This could be due to poor pollination. Try hand-pollinating the flowers or attracting more bees to your garden.
* Small, misshapen fruits: This could be a sign of nutrient deficiency or poor pollination. Make sure you’re fertilizing your watermelon plant regularly and hand-pollinating the flowers if necessary.
* Pests and diseases: As mentioned earlier, keep an eye out for common watermelon pests and diseases and take action to control them as soon as possible.
Enjoying Your Homegrown Watermelon
Congratulations! You’ve successfully grown a watermelon in a small planter. Now it’s time to enjoy the fruits (literally!) of your labor. Cut open your watermelon and savor the sweet, juicy flavor. You can eat it fresh, use it in smoothies, or make watermelon juice. The possibilities are endless!
Growing watermelons in small planters is a rewarding experience that anyone can enjoy. With a little bit of planning and care, you can have your own homegrown watermelons, no matter how small your space is. Happy gardening!
Conclusion
So, there you have it! Growing your own miniature watermelon in a small planter is not just a fun project; it’s a rewarding experience that brings the joy of gardening right to your doorstep, balcony, or even windowsill. We’ve walked you through the process, from selecting the right seeds and planter to nurturing your tiny watermelon vine to its sweet, juicy fruition.
Why is this DIY trick a must-try? Because it democratizes gardening. You don’t need acres of land to enjoy the satisfaction of harvesting your own food. This method allows anyone, regardless of their living situation, to participate in the miracle of growing. Imagine the delight of sharing a homegrown, perfectly portioned watermelon with friends and family, knowing you nurtured it from a tiny seed. It’s a conversation starter, a source of pride, and a delicious treat all rolled into one.
But the fun doesn’t stop there! Feel free to experiment with different watermelon varieties. Perhaps you’d like to try a yellow watermelon for a unique twist, or a seedless variety for even easier snacking. You can also explore different training methods for your vine. Consider using a small trellis or support structure to guide its growth and maximize space. Adding companion plants like basil or marigolds to your planter can also help deter pests and attract beneficial insects, creating a healthier ecosystem for your watermelon.
Don’t be afraid to get creative with your planter, too! While we recommended a specific size, you can adapt the method to slightly larger containers if you have the space. Just remember to adjust your watering and fertilizing schedule accordingly. You can even decorate your planter to match your personal style, adding a touch of whimsy to your miniature watermelon garden.
Ultimately, the success of your small planter watermelon project hinges on your dedication and attention to detail. Consistent watering, proper fertilization, and vigilant pest control are key to a bountiful harvest. But even if you encounter challenges along the way, remember that gardening is a learning process. Each mistake is an opportunity to grow (pun intended!) and improve your skills.
We wholeheartedly encourage you to embark on this exciting gardening adventure. It’s a fantastic way to connect with nature, learn about the life cycle of plants, and enjoy the fruits (literally!) of your labor. And most importantly, we want to hear about your experience! Share your photos, tips, and stories with us in the comments below. Let’s create a community of miniature watermelon growers and inspire others to discover the joy of small-space gardening. So, grab your seeds, your planter, and your gardening gloves, and get ready to grow your own delicious, miniature watermelon! We can’t wait to see what you create.
Frequently Asked Questions (FAQ)
What is the best type of watermelon to grow in a small planter?
The best watermelon varieties for small planters are bush or dwarf types. These varieties are specifically bred to have shorter vines and smaller fruits, making them ideal for container gardening. Some popular choices include ‘Bush Sugar Baby,’ ‘Golden Midget,’ ‘Tiger Baby,’ and ‘Yellow Doll.’ These varieties typically produce watermelons that are 6-8 inches in diameter, which is a manageable size for a small planter. Avoid larger, vining varieties like ‘Charleston Gray’ or ‘Crimson Sweet,’ as they require significantly more space and are unlikely to thrive in a container. When selecting your seeds, carefully read the seed packet to ensure that the variety is suitable for container gardening.
How much sunlight does my small planter watermelon need?
Watermelons are sun-loving plants and require at least 6-8 hours of direct sunlight per day to thrive. Choose a location for your planter that receives ample sunlight throughout the day. If you live in an area with limited sunlight, you may need to supplement with artificial lighting, such as grow lights. Position the grow lights about 6-12 inches above the plant and provide 14-16 hours of light per day. Rotate your planter regularly to ensure that all sides of the plant receive equal exposure to sunlight. Insufficient sunlight can result in stunted growth, poor fruit production, and bland-tasting watermelons.
How often should I water my small planter watermelon?
Watermelons need consistent moisture, especially during hot weather and fruit development. Water your plant deeply whenever the top inch of soil feels dry to the touch. Avoid overwatering, as this can lead to root rot. Ensure that your planter has adequate drainage to prevent water from pooling at the bottom. During hot, dry periods, you may need to water your plant daily. In cooler weather, you can reduce the frequency of watering. Check the soil moisture regularly and adjust your watering schedule accordingly. A good rule of thumb is to water thoroughly until water drains out of the bottom of the planter.
What type of fertilizer should I use for my small planter watermelon?
Watermelons are heavy feeders and require regular fertilization to produce healthy vines and sweet, juicy fruits. Use a balanced fertilizer with an NPK ratio of 10-10-10 or 14-14-14. Apply the fertilizer according to the instructions on the package. You can also supplement with organic fertilizers, such as compost tea or fish emulsion. During the early stages of growth, focus on nitrogen-rich fertilizers to promote leafy growth. Once the plant starts to flower, switch to a phosphorus-rich fertilizer to encourage fruit development. Avoid over-fertilizing, as this can lead to excessive vegetative growth and reduced fruit production.
How do I pollinate my watermelon flowers?
Watermelons have separate male and female flowers. The female flowers have a small, immature watermelon at the base, while the male flowers do not. Pollination is necessary for the female flowers to develop into watermelons. In a small planter, you may need to hand-pollinate the flowers to ensure successful fruit set. To hand-pollinate, use a small paintbrush or cotton swab to collect pollen from the male flowers and transfer it to the stigma of the female flowers. Do this in the morning, when the pollen is most viable. You can also attract pollinators to your garden by planting flowers that attract bees and other beneficial insects.
How long does it take to grow a watermelon in a small planter?
The time it takes to grow a watermelon in a small planter depends on the variety, climate, and growing conditions. Generally, it takes about 70-90 days from planting to harvest. Bush or dwarf varieties tend to mature faster than larger, vining varieties. Monitor your plant closely and harvest the watermelon when it is ripe. Signs of ripeness include a dull thud when tapped, a yellow spot on the underside where it rests on the ground, and a dried tendril closest to the fruit.
How do I prevent pests and diseases in my small planter watermelon?
Watermelons are susceptible to various pests and diseases, such as aphids, squash bugs, vine borers, and powdery mildew. Inspect your plant regularly for signs of infestation or disease. Use organic pest control methods, such as insecticidal soap or neem oil, to control pests. Ensure good air circulation around the plant to prevent fungal diseases. Remove any infected leaves or fruits promptly. You can also use companion planting to deter pests and attract beneficial insects. Marigolds, basil, and nasturtiums are good companion plants for watermelons.
Can I grow more than one watermelon plant in a small planter?
It is generally not recommended to grow more than one watermelon plant in a small planter, as they require a lot of space and nutrients. Overcrowding can lead to stunted growth, reduced fruit production, and increased susceptibility to pests and diseases. If you want to grow multiple watermelon plants, it is best to use separate planters for each plant.
What do I do if my watermelon plant is not producing fruit?
There are several reasons why your watermelon plant may not be producing fruit. These include insufficient sunlight, poor pollination, lack of nutrients, and stress from pests or diseases. Ensure that your plant is receiving at least 6-8 hours of direct sunlight per day. Hand-pollinate the flowers if necessary. Fertilize your plant regularly with a balanced fertilizer. Control pests and diseases promptly. Provide adequate water and drainage. If you address these issues, your watermelon plant should start producing fruit.
Leave a Comment