

Soilless Potato Growing: Imagine harvesting a bounty of potatoes right from your balcony, patio, or even your kitchen counter, without ever touching a speck of soil! Sounds like something out of a futuristic farm, doesn’t it? Well, it’s not! It’s the magic of soilless potato growing, and I’m here to show you how to do it yourself.
For centuries, potatoes have been a staple food, deeply intertwined with cultures worldwide. From the Andean highlands where they originated to the Irish potato famine that shaped history, this humble tuber has played a significant role in human civilization. But traditional potato farming can be labor-intensive and space-consuming. That’s where soilless methods come in!
In today’s world, where space is a premium and sustainable practices are increasingly important, soilless potato growing offers a fantastic solution. Whether you’re an apartment dweller with limited outdoor space or a seasoned gardener looking for a new challenge, this DIY guide will empower you to grow your own delicious potatoes using innovative techniques. I’ll walk you through everything you need to know, from choosing the right containers and nutrient solutions to troubleshooting common problems. Get ready to ditch the dirt and embrace a cleaner, more efficient way to enjoy fresh, homegrown potatoes!

Growing Potatoes Without Soil: A Fun and Easy DIY Project!
Hey there, fellow gardening enthusiasts! Ever thought about growing potatoes without any soil? Sounds crazy, right? Well, it’s totally doable, and I’m here to walk you through it. This method, often called “container gardening” or “potato towers,” is perfect if you’re short on space, have poor soil quality, or just want to try something new and exciting. Get ready to harvest a mountain of spuds from a small area!
What You’ll Need
Before we dive in, let’s gather our supplies. This is crucial for a smooth and successful potato-growing adventure.
* Seed Potatoes: These are potatoes specifically grown for planting. You can find them at your local garden center or online. Choose varieties that are known to perform well in your climate. I personally love Yukon Gold and Russet potatoes for this method.
* Large Container: A plastic bin, a large pot, or even a repurposed trash can (cleaned thoroughly, of course!) will work. The bigger, the better, as potatoes need room to grow. Aim for at least 2 feet in diameter and 3 feet in height.
* Growing Medium: We’re not using soil, remember? Instead, we’ll use a mix of peat moss, compost, and perlite or vermiculite. This provides excellent drainage and aeration, which potatoes love. You can also use coco coir as a peat moss alternative.
* Water: Essential for all life, including potatoes!
* Fertilizer: A balanced, slow-release fertilizer will provide your potatoes with the nutrients they need to thrive. Look for one specifically formulated for vegetables.
* Sharp Knife: For cutting the seed potatoes (if necessary).
* Gloves: To protect your hands.
* Optional: A drill for drainage holes (if your container doesn’t have them).
Preparing Your Seed Potatoes
This step is important for maximizing your potato yield.
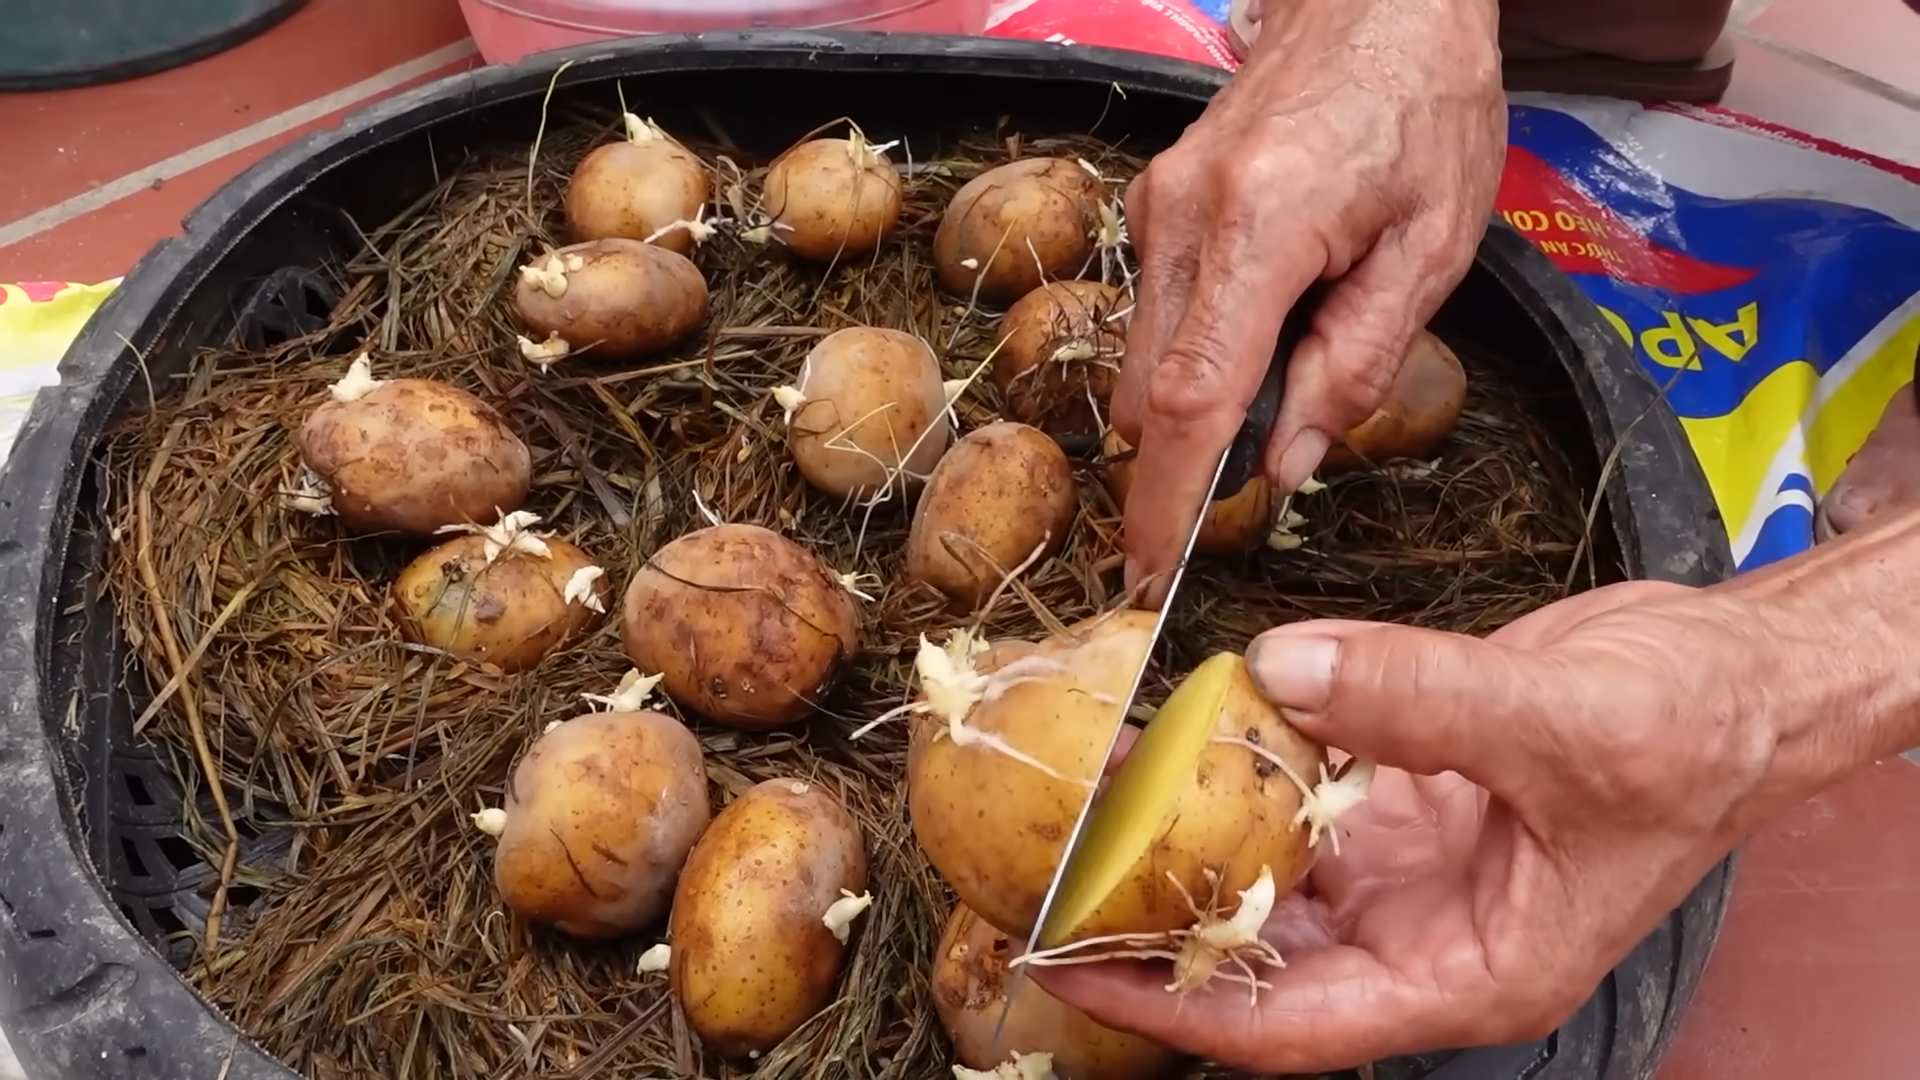
1. Chitting (Optional but Recommended): Chitting is the process of encouraging your seed potatoes to sprout before planting. This gives them a head start. To chit your potatoes, place them in a cool, bright location (but not direct sunlight) for a few weeks. You’ll see small, green sprouts (called “eyes”) emerge.
2. Cutting (If Necessary): If your seed potatoes are large (bigger than an egg), you can cut them into smaller pieces. Each piece should have at least one or two “eyes.” Let the cut pieces dry for a day or two to callous over. This helps prevent rotting. I usually cut mine into pieces about the size of a golf ball.
3. Choosing the Right Pieces: When cutting, make sure each piece has a good number of eyes. These are where the new potato plants will sprout from. Discard any pieces that look rotten or diseased.
Setting Up Your Potato Container
Now, let’s get our container ready for planting.
1. Drainage: Ensure your container has adequate drainage. If it doesn’t, drill several holes in the bottom. Potatoes don’t like sitting in soggy soil (or soilless mix!).
2. First Layer: Add a layer of your growing medium to the bottom of the container, about 6-8 inches deep. Mix in some slow-release fertilizer according to the package directions. I usually use a handful per layer.
3. Planting the Seed Potatoes: Place your seed potato pieces on top of the growing medium, with the “eyes” facing upwards. Space them evenly, about 8-10 inches apart.
4. Covering the Potatoes: Cover the seed potatoes with another 4-6 inches of growing medium. Gently water the container until the medium is moist but not soggy.
The “Hilling” Process: The Key to More Potatoes!
This is where the magic happens! “Hilling” encourages the potato plants to produce more potatoes along their stems.
1. Waiting for Growth: Wait until the potato plants have emerged and are about 6-8 inches tall.
2. Adding More Medium: Add another layer of growing medium to the container, covering the stems of the plants, leaving only the top few leaves exposed. This is the “hilling” process.
3. Repeating the Process: As the plants continue to grow, repeat the hilling process every few weeks, adding more growing medium until you reach the top of the container. The more of the stem you cover, the more potatoes you’ll get! I usually hill every 2-3 weeks.
4. Watering: Keep the growing medium consistently moist, but not waterlogged. Water deeply whenever the top inch or two feels dry.
5. Fertilizing: Continue to fertilize your potato plants every few weeks with a balanced fertilizer. Follow the package directions.
Caring for Your Potato Plants
Proper care is essential for a bountiful harvest.
1. Sunlight: Potatoes need at least 6-8 hours of sunlight per day. Place your container in a sunny location.
2. Watering: As mentioned before, keep the growing medium consistently moist. Check the moisture level regularly, especially during hot weather.
3. Fertilizing: Continue to fertilize your plants every few weeks.
4. Pest Control: Keep an eye out for pests like aphids, potato beetles, and flea beetles. If you spot any, take action immediately. You can use insecticidal soap or neem oil to control them. I prefer organic solutions whenever possible.
5. Disease Prevention: Potatoes are susceptible to diseases like blight. To prevent diseases, ensure good air circulation around your plants and avoid overwatering.
Harvesting Your Potatoes
The moment we’ve all been waiting for!
1. When to Harvest: Potatoes are typically ready to harvest about 80-100 days after planting. You’ll know they’re ready when the plants start to flower and the foliage begins to die back.
2. Harvesting: Stop watering the plants a week or two before harvesting. This will help the potatoes to cure and store better. To harvest, simply tip the container over and carefully dig through the growing medium to find your potatoes.
3. Curing: After harvesting, cure your potatoes by placing them in a cool, dark, and well-ventilated place for a week or two. This will help them to develop a thicker skin and prevent rotting.
4. Storing: Store your cured potatoes in a cool, dark, and dry place. They should last for several months.
Troubleshooting
Even with the best planning, things can sometimes go wrong. Here are a few common problems and how to fix them.
* Yellowing Leaves: This could be a sign of overwatering, underwatering, or nutrient deficiency. Check the moisture level of the growing medium and adjust your watering accordingly. Fertilize your plants with a balanced fertilizer.
* Small Potatoes: This could be due to insufficient sunlight, poor soil quality, or overcrowding. Make sure your plants are getting enough sunlight and fertilize them regularly. If you planted too many seed potatoes in one container, consider thinning them out.
* Rotting Potatoes: This is usually caused by overwatering or poor drainage. Make sure your container has adequate drainage and avoid overwatering.
* Pests: As mentioned before, keep an eye out for pests and take action immediately.
Tips for Success
Here are a few extra tips to help you grow the best potatoes ever!
* Choose the Right Variety: Select potato varieties that are well-suited to your climate and growing conditions.
* Use High-Quality Seed Potatoes: Don’t skimp on the seed potatoes! Using high-quality seed potatoes will give you a much better chance of success.
* Don’t Overwater: Overwatering is one of the most common mistakes that people make when growing potatoes. Make sure the growing medium is moist but not soggy.
* Fertilize Regularly: Potatoes are heavy feeders, so they need to be fertilized regularly.
* Be Patient: Growing potatoes takes time and patience. Don’t get discouraged if you don’t see results immediately.
Why I Love This Method
I absolutely love growing potatoes in containers because it’s so easy and rewarding. It’s a great way to grow your own food, even if you don’t have a lot of space. Plus, it’s just plain fun! There’s nothing quite like digging through the growing medium and discovering a treasure trove of homegrown potatoes. Give it a try, and I’m sure you’ll love it too! Happy gardenin
Hey there, fellow gardening enthusiasts! Ever thought about growing potatoes without any soil? Sounds crazy, right? Well, it’s totally doable, and I’m here to walk you through it. This method, often called “container gardening” or “potato towers,” is perfect if you’re short on space, have poor soil quality, or just want to try something new and exciting. Get ready to harvest a mountain of spuds from a small area!
What You’ll Need
Before we dive in, let’s gather our supplies. This is crucial for a smooth and successful potato-growing adventure.
* Seed Potatoes: These are potatoes specifically grown for planting. You can find them at your local garden center or online. Choose varieties that are known to perform well in your climate. I personally love Yukon Gold and Russet potatoes for this method.
* Large Container: A plastic bin, a large pot, or even a repurposed trash can (cleaned thoroughly, of course!) will work. The bigger, the better, as potatoes need room to grow. Aim for at least 2 feet in diameter and 3 feet in height.
* Growing Medium: We’re not using soil, remember? Instead, we’ll use a mix of peat moss, compost, and perlite or vermiculite. This provides excellent drainage and aeration, which potatoes love. You can also use coco coir as a peat moss alternative.
* Water: Essential for all life, including potatoes!
* Fertilizer: A balanced, slow-release fertilizer will provide your potatoes with the nutrients they need to thrive. Look for one specifically formulated for vegetables.
* Sharp Knife: For cutting the seed potatoes (if necessary).
* Gloves: To protect your hands.
* Optional: A drill for drainage holes (if your container doesn’t have them).
Preparing Your Seed Potatoes
This step is important for maximizing your potato yield.
1. Chitting (Optional but Recommended): Chitting is the process of encouraging your seed potatoes to sprout before planting. This gives them a head start. To chit your potatoes, place them in a cool, bright location (but not direct sunlight) for a few weeks. You’ll see small, green sprouts (called “eyes”) emerge.
2. Cutting (If Necessary): If your seed potatoes are large (bigger than an egg), you can cut them into smaller pieces. Each piece should have at least one or two “eyes.” Let the cut pieces dry for a day or two to callous over. This helps prevent rotting. I usually cut mine into pieces about the size of a golf ball.
3. Choosing the Right Pieces: When cutting, make sure each piece has a good number of eyes. These are where the new potato plants will sprout from. Discard any pieces that look rotten or diseased.
Setting Up Your Potato Container
Now, let’s get our container ready for planting.
1. Drainage: Ensure your container has adequate drainage. If it doesn’t, drill several holes in the bottom. Potatoes don’t like sitting in soggy soil (or soilless mix!).
2. First Layer: Add a layer of your growing medium to the bottom of the container, about 6-8 inches deep. Mix in some slow-release fertilizer according to the package directions. I usually use a handful per layer.
3. Planting the Seed Potatoes: Place your seed potato pieces on top of the growing medium, with the “eyes” facing upwards. Space them evenly, about 8-10 inches apart.
4. Covering the Potatoes: Cover the seed potatoes with another 4-6 inches of growing medium. Gently water the container until the medium is moist but not soggy.
The “Hilling” Process: The Key to More Potatoes!
This is where the magic happens! “Hilling” encourages the potato plants to produce more potatoes along their stems.
1. Waiting for Growth: Wait until the potato plants have emerged and are about 6-8 inches tall.
2. Adding More Medium: Add another layer of growing medium to the container, covering the stems of the plants, leaving only the top few leaves exposed. This is the “hilling” process.
3. Repeating the Process: As the plants continue to grow, repeat the hilling process every few weeks, adding more growing medium until you reach the top of the container. The more of the stem you cover, the more potatoes you’ll get! I usually hill every 2-3 weeks.
4. Watering: Keep the growing medium consistently moist, but not waterlogged. Water deeply whenever the top inch or two feels dry.
5. Fertilizing: Continue to fertilize your potato plants every few weeks with a balanced fertilizer. Follow the package directions.
Caring for Your Potato Plants
Proper care is essential for a bountiful harvest.
1. Sunlight: Potatoes need at least 6-8 hours of sunlight per day. Place your container in a sunny location.
2. Watering: As mentioned before, keep the growing medium consistently moist. Check the moisture level regularly, especially during hot weather.
3. Fertilizing: Continue to fertilize your plants every few weeks.
4. Pest Control: Keep an eye out for pests like aphids, potato beetles, and flea beetles. If you spot any, take action immediately. You can use insecticidal soap or neem oil to control them. I prefer organic solutions whenever possible.
5. Disease Prevention: Potatoes are susceptible to diseases like blight. To prevent diseases, ensure good air circulation around your plants and avoid overwatering.
Harvesting Your Potatoes
The moment we’ve all been waiting for!
1. When to Harvest: Potatoes are typically ready to harvest about 80-100 days after planting. You’ll know they’re ready when the plants start to flower and the foliage begins to die back.
2. Harvesting: Stop watering the plants a week or two before harvesting. This will help the potatoes to cure and store better. To harvest, simply tip the container over and carefully dig through the growing medium to find your potatoes.
3. Curing: After harvesting, cure your potatoes by placing them in a cool, dark, and well-ventilated place for a week or two. This will help them to develop a thicker skin and prevent rotting.
4. Storing: Store your cured potatoes in a cool, dark, and dry place. They should last for several months.
Troubleshooting
Even with the best planning, things can sometimes go wrong. Here are a few common problems and how to fix them.
* Yellowing Leaves: This could be a sign of overwatering, underwatering, or nutrient deficiency. Check the moisture level of the growing medium and adjust your watering accordingly. Fertilize your plants with a balanced fertilizer.
* Small Potatoes: This could be due to insufficient sunlight, poor soil quality, or overcrowding. Make sure your plants are getting enough sunlight and fertilize them regularly. If you planted too many seed potatoes in one container, consider thinning them out.
* Rotting Potatoes: This is usually caused by overwatering or poor drainage. Make sure your container has adequate drainage and avoid overwatering.
* Pests: As mentioned before, keep an eye out for pests and take action immediately.
Tips for Success
Here are a few extra tips to help you grow the best potatoes ever!
* Choose the Right Variety: Select potato varieties that are well-suited to your climate and growing conditions.
* Use High-Quality Seed Potatoes: Don’t skimp on the seed potatoes! Using high-quality seed potatoes will give you a much better chance of success.
* Don’t Overwater: Overwatering is one of the most common mistakes that people make when growing potatoes. Make sure the growing medium is moist but not soggy.
* Fertilize Regularly: Potatoes are heavy feeders, so they need to be fertilized regularly.
* Be Patient: Growing potatoes takes time and patience. Don’t get discouraged if you don’t see results immediately.
Why I Love This Method
I absolutely love growing potatoes in containers because it’s so easy and rewarding. It’s a great way to grow your own food, even if you don’t have a lot of space. Plus, it’s just plain fun! There’s nothing quite like digging through the growing medium and discovering a treasure trove of homegrown potatoes. Give it a try, and I’m sure you’ll love it too! Happy gardening!
Conclusion
So, there you have it! Growing potatoes without soil might sound like something out of a science fiction movie, but it’s surprisingly simple, incredibly rewarding, and a fantastic way to maximize your yield, especially if you’re short on space or dealing with poor soil conditions. This method, often referred to as container gardening or even hydroponics-lite, allows you to nurture your potato plants in a controlled environment, giving you greater control over their growth and development.
Why is this soilless potato growing trick a must-try? Firstly, it significantly reduces the risk of soilborne diseases and pests that can plague traditional potato crops. Secondly, it’s incredibly space-efficient, making it perfect for apartment dwellers, balcony gardeners, or anyone with limited yard space. Imagine harvesting a bountiful crop of potatoes from a single container on your patio! Thirdly, the process is fascinating and educational, offering a hands-on learning experience for both adults and children. It’s a fantastic way to connect with your food and understand the science behind plant growth.
But the best part? The possibilities are endless! Feel free to experiment with different container sizes, nutrient solutions, and even potato varieties. Try using a larger container for a potentially bigger yield, or explore different types of growing mediums like coco coir or perlite to see which works best for you. You could even add companion plants like marigolds or basil to your container to deter pests and enhance the flavor of your potatoes.
Consider using a self-watering container to minimize the need for constant monitoring. Or, if you’re feeling adventurous, you could even set up a simple hydroponic system with a recirculating nutrient solution for even faster growth and higher yields. The key is to have fun and adapt the method to suit your specific needs and preferences.
We’re confident that once you try this method, you’ll be amazed by the results. The satisfaction of harvesting your own homegrown potatoes, knowing that you nurtured them from start to finish, is truly unparalleled. Plus, you’ll have a delicious and nutritious ingredient readily available for all your favorite potato dishes.
So, what are you waiting for? Gather your supplies, choose your favorite potato variety, and get ready to embark on a soilless potato growing adventure! We encourage you to document your progress, share your successes (and even your challenges!), and connect with other gardeners who are exploring this innovative technique. Share your photos and stories on social media using relevant hashtags, and let’s build a community of soilless potato growers! We can’t wait to see what you create!
Frequently Asked Questions (FAQ)
What kind of potatoes are best for soilless growing?
Almost any potato variety can be grown using soilless methods, but some tend to perform better than others. Early-maturing varieties like Yukon Gold, Red Norland, and Irish Cobbler are often recommended because they have a shorter growing season and are less susceptible to diseases. However, you can certainly experiment with other varieties like Russet Burbank or fingerling potatoes. Consider your local climate and growing conditions when making your selection. Seed potatoes are the best starting point, but you can also sprout potatoes from the grocery store, ensuring they are organic and free from sprout inhibitors.
What kind of container should I use?
The size of the container is crucial for successful soilless potato growing. A 10-gallon container is generally considered the minimum size for a single potato plant, but larger containers (15-20 gallons) are even better, especially if you plan to grow multiple plants in the same container. The container should also have drainage holes to prevent waterlogging. You can use plastic pots, grow bags, or even repurposed containers like buckets or trash cans. Just make sure the container is clean and free of any harmful chemicals. Fabric grow bags are a popular choice because they allow for good aeration and drainage, which can promote healthier root growth.
What kind of growing medium should I use?
While the method is called “soilless,” you still need a growing medium to support the potato plants and provide them with nutrients. A mixture of coco coir, perlite, and vermiculite is a popular choice because it provides good drainage, aeration, and water retention. You can also use a commercially available soilless potting mix specifically designed for container gardening. Avoid using garden soil, as it can compact and become waterlogged in containers. The growing medium should be loose and well-draining to allow the potato tubers to develop properly.
How often should I water my soilless potatoes?
Watering frequency will depend on several factors, including the size of the container, the type of growing medium, the weather conditions, and the stage of plant growth. Generally, you should water your potato plants when the top inch of the growing medium feels dry to the touch. Avoid overwatering, as this can lead to root rot. During hot and dry weather, you may need to water more frequently. Use a watering can or a hose with a gentle spray nozzle to avoid disturbing the roots. Consider using a moisture meter to accurately assess the moisture level in the growing medium.
What kind of fertilizer should I use?
Potatoes are heavy feeders, so they require a consistent supply of nutrients to thrive. Use a balanced fertilizer specifically formulated for vegetables or potatoes. A fertilizer with a higher potassium content is particularly beneficial for tuber development. You can use a slow-release granular fertilizer or a liquid fertilizer. If using a liquid fertilizer, apply it every 1-2 weeks according to the package instructions. Avoid over-fertilizing, as this can lead to nutrient burn. Monitor your plants for signs of nutrient deficiencies, such as yellowing leaves or stunted growth, and adjust your fertilization schedule accordingly.
How do I “hill” the potatoes in a container?
“Hilling” is the process of adding more growing medium around the potato stems as they grow. This encourages the plant to produce more tubers along the buried stems. Start by filling the container about halfway with the growing medium. As the potato plants grow, gradually add more growing medium around the stems, leaving only the top few leaves exposed. Repeat this process every few weeks until the container is almost full. This technique maximizes the potato yield in a limited space.
When are the potatoes ready to harvest?
The harvest time will depend on the potato variety and the growing conditions. Generally, potatoes are ready to harvest when the foliage starts to turn yellow and die back. You can also gently dig around the base of the plant to check the size of the tubers. If the tubers are the desired size, you can harvest the entire plant. To harvest, carefully tip the container over and gently remove the potatoes from the growing medium. Be careful not to damage the tubers. Cure the potatoes in a cool, dark, and well-ventilated place for a few days before storing them.
Can I grow potatoes indoors using this method?
Yes, you can grow potatoes indoors using soilless methods, but you will need to provide them with adequate light. A sunny window may not be sufficient, so you may need to supplement with artificial grow lights. LED grow lights are a good option because they are energy-efficient and provide the full spectrum of light that plants need to grow. You will also need to ensure that the plants have good air circulation and are protected from extreme temperatures.
What are some common problems I might encounter?
Some common problems you might encounter when growing potatoes soillessly include pests, diseases, and nutrient deficiencies. Monitor your plants regularly for signs of pests like aphids, potato beetles, or flea beetles. Treat infestations promptly with insecticidal soap or neem oil. Prevent diseases by providing good air circulation and avoiding overwatering. Address nutrient deficiencies by adjusting your fertilization schedule. With proper care and attention, you can overcome these challenges and enjoy a bountiful harvest of homegrown potatoes.
Leave a Comment