

Soilless Rosemary Growing: Ever dreamed of snipping fresh, fragrant rosemary right from your own kitchen, even if you don’t have a sprawling garden? I know I have! For centuries, rosemary has been cherished not only for its culinary prowess but also for its medicinal and symbolic significance, representing remembrance and love in various cultures. But let’s face it, not everyone has the ideal soil conditions or the space for a traditional rosemary garden. That’s where the magic of soilless growing comes in!
This DIY guide is your passport to cultivating thriving rosemary without the fuss of soil. Imagine bypassing the challenges of soil-borne diseases, nutrient deficiencies, and pesky weeds. With soilless rosemary growing, you’re in complete control of the plant’s environment, ensuring optimal conditions for robust growth and aromatic leaves. Whether you’re a seasoned gardener or a complete beginner, this method opens up a world of possibilities, allowing you to enjoy the delightful benefits of fresh rosemary regardless of your living situation. So, let’s dive in and unlock the secrets to successful soilless rosemary growing!
Growing Rosemary Without Soil: A DIY Guide to Hydroponic Rosemary
Hey there, fellow plant enthusiasts! Ever thought about growing rosemary without getting your hands dirty? I’m talking about hydroponics! It might sound intimidating, but trust me, it’s a super rewarding and surprisingly easy way to cultivate this fragrant herb. I’ve been experimenting with hydroponic rosemary for a while now, and I’m excited to share my secrets with you. Get ready to ditch the soil and dive into the world of soilless gardening!
What You’ll Need: Your Rosemary Hydroponic Shopping List
Before we get started, let’s gather our supplies. Here’s what you’ll need to create your own hydroponic rosemary setup:
* Rosemary Cuttings: You can either take cuttings from an existing rosemary plant (about 4-6 inches long) or purchase them from a nursery. Make sure they’re healthy and free from disease.
* Rockwool Cubes or Coco Coir Plugs: These will serve as your initial growing medium for the cuttings. Rockwool is great for its water retention, while coco coir is a sustainable alternative.
* Net Pots: These are small, mesh pots that will hold your rosemary plants in the hydroponic system. Choose a size that fits comfortably in your system.
* Hydroponic Nutrient Solution: This is your plant’s food! Look for a balanced nutrient solution specifically formulated for herbs or leafy greens. I personally prefer a solution with a higher nitrogen content for rosemary.
* Hydroponic System: You have a few options here. You can buy a pre-made hydroponic system (like a deep water culture (DWC) system, nutrient film technique (NFT) system, or ebb and flow system), or you can build your own! For beginners, I recommend starting with a simple DWC system.
* Air Pump and Air Stone: If you’re using a DWC system, you’ll need an air pump and air stone to oxygenate the nutrient solution. This is crucial for healthy root development.
* pH Meter or pH Test Kit: Maintaining the correct pH level is essential for nutrient absorption. A pH meter is more accurate, but a test kit will work in a pinch.
* Grow Lights (Optional): If you don’t have a sunny spot, you’ll need grow lights to provide your rosemary with the light it needs. LED grow lights are energy-efficient and work well.
* Water: Use filtered or distilled water for your nutrient solution. Tap water can contain minerals that can interfere with nutrient absorption.
* Measuring Cups and Spoons: For accurately measuring your nutrient solution.
* Clean Bucket or Container: To mix your nutrient solution.
* Spray Bottle: For misting your rosemary cuttings.
* Rooting Hormone (Optional): This can help speed up the rooting process, but it’s not strictly necessary.
Section 1: Rooting Your Rosemary Cuttings
This is the first and arguably most important step. We need to get those cuttings to sprout roots before we can transfer them to the hydroponic system.
1. Prepare Your Cuttings: Using clean scissors or pruning shears, trim the bottom leaves off your rosemary cuttings, leaving only the top few sets of leaves. This will encourage root growth.
2. Dip in Rooting Hormone (Optional): If you’re using rooting hormone, dip the cut end of each cutting into the powder or gel.
3. Prepare Your Growing Medium: Soak your rockwool cubes or coco coir plugs in water until they’re fully saturated. Gently squeeze out any excess water.
4. Insert the Cuttings: Make a small hole in the center of each cube or plug and carefully insert a rosemary cutting. Make sure the cutting is snug but not too tight.
5. Create a Humid Environment: Place the cubes or plugs in a tray or container and cover them with a clear plastic dome or plastic wrap. This will help maintain humidity and encourage rooting.
6. Misting is Key: Mist the cuttings with water daily to keep them hydrated.
7. Provide Light: Place the tray under grow lights or in a bright, indirect sunlight location. Avoid direct sunlight, which can scorch the cuttings.
8. Patience is a Virtue: It can take anywhere from 2-4 weeks for the cuttings to develop roots. Check them regularly and be patient! You’ll know they’re ready when you see roots emerging from the bottom of the cubes or plugs.
Section 2: Setting Up Your Hydroponic System
Now that your rosemary cuttings have roots, it’s time to set up your hydroponic system. I’ll walk you through setting up a simple DWC (Deep Water Culture) system, which is perfect for beginners.
1. Prepare Your Reservoir: Choose a container that’s large enough to hold your nutrient solution and accommodate the roots of your rosemary plants. A 5-gallon bucket works well for a few plants.
2. Drill Holes for Net Pots: Drill holes in the lid of your reservoir that are slightly smaller than the diameter of your net pots. This will allow the net pots to sit securely in the lid.
3. Mix Your Nutrient Solution: Follow the instructions on your hydroponic nutrient solution to mix it with water. Use filtered or distilled water for best results.
4. Check and Adjust pH: Use your pH meter or test kit to check the pH of your nutrient solution. Rosemary prefers a pH between 5.5 and 6.5. Adjust the pH as needed using pH up or pH down solutions.
5. Add Air Stone and Air Pump: Place the air stone at the bottom of your reservoir and connect it to the air pump with tubing. The air pump will provide oxygen to the nutrient solution, which is essential for root health.
6. Fill the Reservoir: Pour the nutrient solution into the reservoir, leaving a few inches of space at the top.
Section 3: Transplanting and Growing Your Rosemary
The moment we’ve been waiting for! Let’s get those rooted cuttings into their new hydroponic home.
1. Gently Remove Cuttings: Carefully remove the rooted rosemary cuttings from the rockwool cubes or coco coir plugs. Be gentle to avoid damaging the roots.
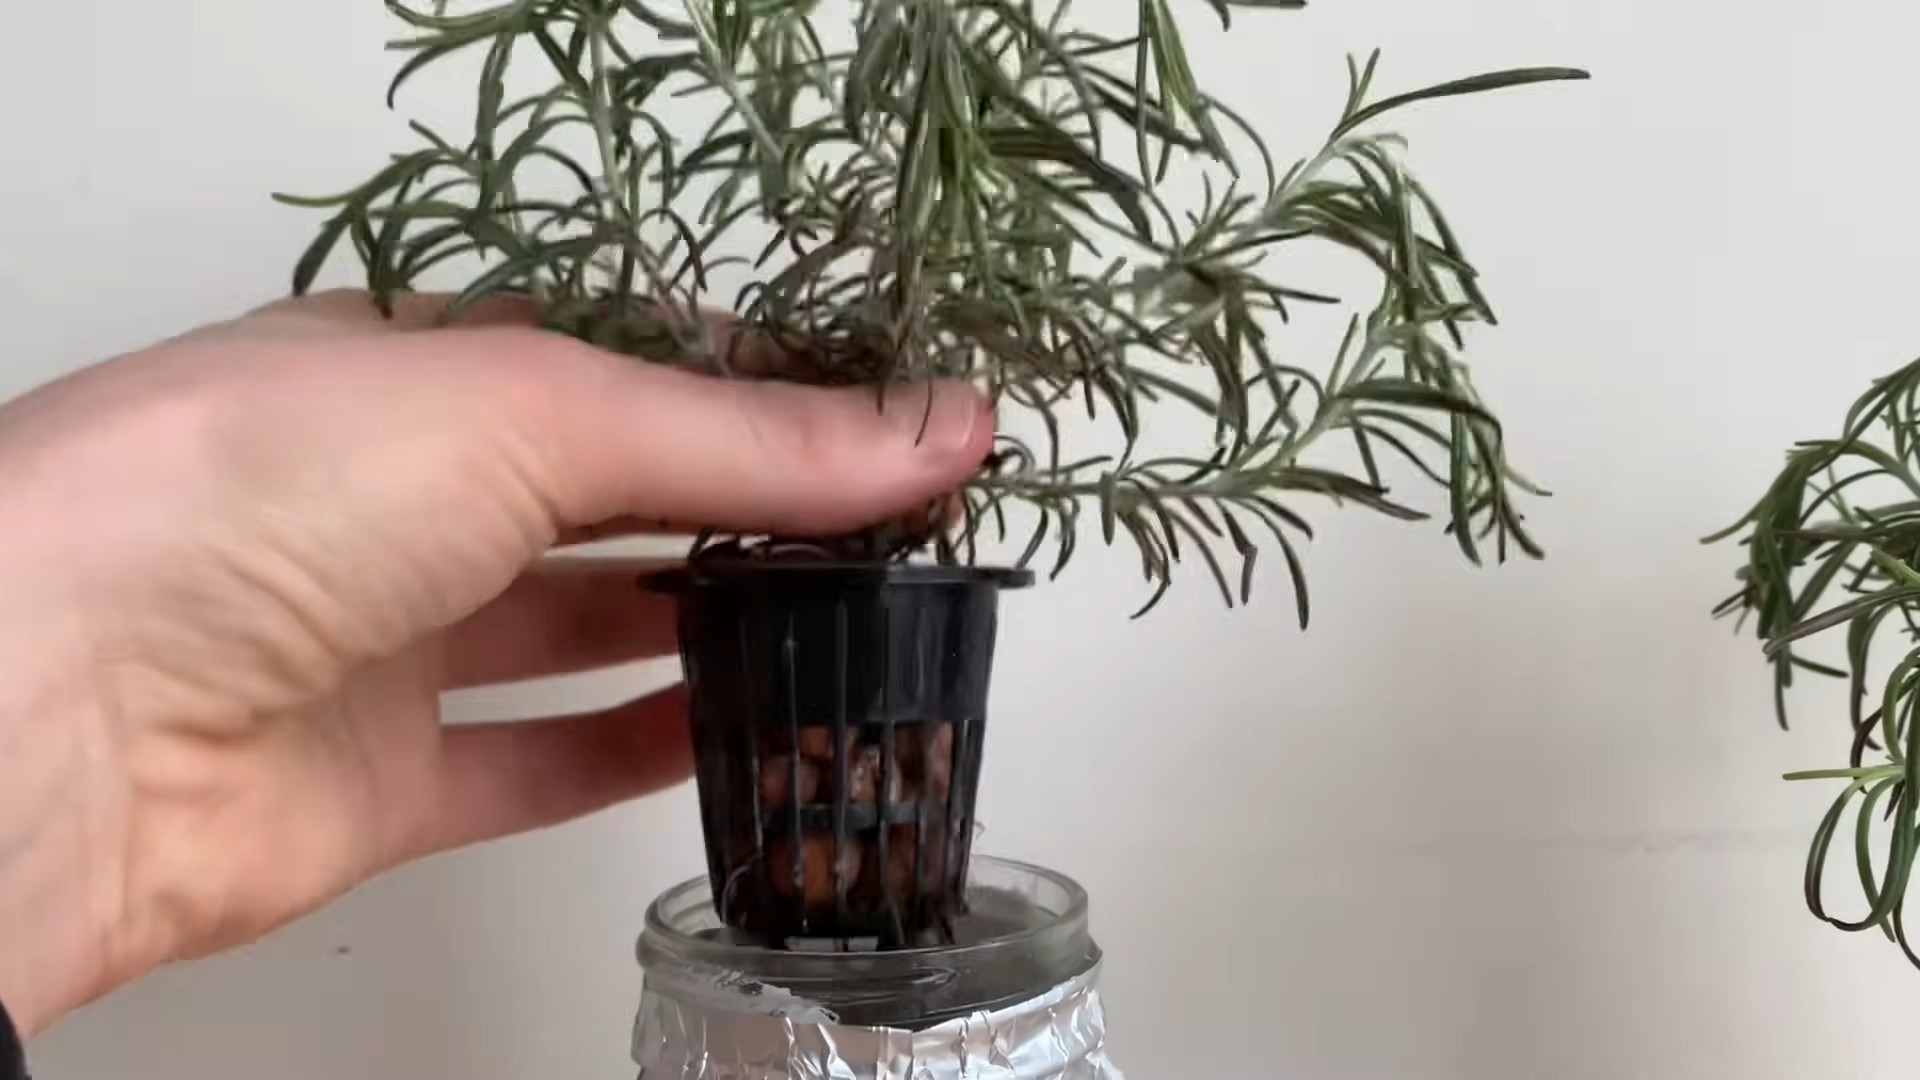
2. Place in Net Pots: Place each cutting in a net pot, ensuring that the roots are hanging down. You can add some hydroton clay pebbles around the base of the cutting to provide support, but it’s not always necessary.
3. Position Net Pots in Reservoir: Place the net pots into the holes in the lid of your reservoir. The roots should be submerged in the nutrient solution.
4. Provide Light: Place your hydroponic system under grow lights or in a sunny location. Rosemary needs at least 6 hours of sunlight per day.
5. Monitor Nutrient Solution: Check the nutrient solution regularly and replenish it as needed. You’ll also need to change the entire solution every 1-2 weeks to prevent nutrient buildup.
6. Maintain pH Levels: Continue to monitor and adjust the pH of the nutrient solution as needed.
7. Prune Regularly: Prune your rosemary plants regularly to encourage bushier growth. You can use the pruned leaves for cooking or drying.
8. Watch for Pests and Diseases: Keep an eye out for pests and diseases. If you notice any problems, address them promptly.
9. Enjoy Your Harvest! With proper care, your hydroponic rosemary plants will thrive and provide you with a continuous supply of fresh herbs.
Troubleshooting Tips for Hydroponic Rosemary
Even with the best planning, you might encounter some challenges. Here are a few common issues and how to address them:
* Yellowing Leaves: This could be a sign of nutrient deficiency. Make sure you’re using a balanced nutrient solution and that the pH is within the correct range.
* Root Rot: This is caused by a lack of oxygen in the nutrient solution. Make sure your air pump is working properly and that the air stone is providing adequate aeration.
* Slow Growth: This could be due to insufficient light. Make sure your rosemary plants are getting enough light, either from grow lights or natural sunlight.
* Pests: Common pests like aphids and spider mites can attack rosemary plants. Treat them with insecticidal soap or neem oil.
* Algae Growth: Algae can grow in the nutrient solution if it’s exposed to light. Use an opaque container to prevent algae growth.
Choosing the Right Hydroponic System for Rosemary
While I recommended a DWC system for beginners, there are other hydroponic systems that can work well for rosemary. Here’s a quick overview:
* Deep Water Culture (DWC): Simple and inexpensive, perfect for beginners. Roots are submerged in nutrient solution.
* Nutrient Film Technique (NFT): A thin film of nutrient solution flows over the roots. Requires a pump and a sloped channel.

Conclusion
So, there you have it! Growing rosemary without soil might seem unconventional, but as you’ve seen, it’s a surprisingly simple and incredibly rewarding method. This DIY trick isn’t just about bypassing the mess of traditional gardening; it’s about unlocking a faster, cleaner, and often more successful way to cultivate this fragrant herb. Think about it: no more battling soilborne diseases, no more wrestling with inconsistent watering, and no more worrying about nutrient deficiencies. You’re essentially creating a controlled environment where your rosemary can thrive, focusing its energy on growth rather than survival.
Why is this a must-try? Because it simplifies the entire process. It’s perfect for apartment dwellers, busy individuals, or anyone who’s ever struggled with traditional gardening. Plus, the visual appeal of rosemary roots suspended in water or nestled in LECA pebbles is undeniably charming. It adds a touch of modern, botanical chic to any space.
But the benefits don’t stop there. This soilless rosemary growing method allows for easy monitoring of root health. You can quickly spot any issues and address them before they escalate. And because you’re in control of the nutrient solution, you can tailor it to your rosemary’s specific needs, ensuring optimal growth and flavor.
Ready to experiment? Consider these variations:
* Hydroponic Systems: For a more advanced setup, explore hydroponic systems like deep water culture (DWC) or nutrient film technique (NFT). These systems automate the nutrient delivery process, making it even easier to maintain your rosemary plants.
* LECA vs. Water Culture: Experiment with different growing mediums. While water culture is simple and effective, LECA pebbles provide added support and aeration for the roots.
* Rosemary Varieties: Try growing different rosemary varieties using this method. Some varieties, like ‘Trailing Rosemary,’ might be particularly well-suited for hanging baskets or cascading displays.
* Nutrient Solution Tweaks: Research the specific nutrient requirements of rosemary and adjust your nutrient solution accordingly. You might find that adding certain micronutrients enhances the flavor or growth of your plants.
Ultimately, the best way to discover the magic of soilless rosemary growing is to dive in and try it yourself. Don’t be afraid to experiment, adapt, and learn from your experiences. We’re confident that you’ll be amazed by the results.
We encourage you to embark on this exciting gardening adventure. Once you’ve experienced the ease and success of growing rosemary without soil, we’d love to hear about it! Share your photos, tips, and stories in the comments below. Let’s build a community of soilless rosemary enthusiasts and inspire others to embrace this innovative approach to gardening. Your insights could be invaluable to someone just starting out. So, grab your cuttings, prepare your nutrient solution, and get ready to enjoy the fresh, aromatic flavor of homegrown rosemary, all without getting your hands dirty!
Frequently Asked Questions (FAQs)
What exactly is soilless rosemary growing, and why should I consider it?
Soilless rosemary growing, also known as hydroponics or water culture, is a method of cultivating rosemary plants without using traditional soil. Instead, the roots are suspended in water or supported by an inert medium like LECA pebbles, and they receive nutrients from a specially formulated solution. You should consider it because it offers several advantages over traditional soil-based gardening, including:
* Reduced Risk of Soilborne Diseases: Soil can harbor various pathogens that can harm rosemary plants. Soilless growing eliminates this risk.
* Improved Nutrient Control: You have precise control over the nutrients your rosemary receives, ensuring optimal growth and flavor.
* Faster Growth Rates: With readily available nutrients and oxygen, rosemary plants often grow faster in soilless systems.
* Space Efficiency: Soilless growing is ideal for small spaces, such as apartments or balconies.
* Less Mess: No soil means no dirt to deal with, making it a cleaner and more convenient gardening option.
What kind of nutrient solution do I need for soilless rosemary growing?
Rosemary requires a balanced nutrient solution containing essential macronutrients (nitrogen, phosphorus, potassium) and micronutrients (iron, manganese, zinc, copper, boron, molybdenum). You can purchase commercially available hydroponic nutrient solutions specifically formulated for herbs or vegetables. Look for solutions with an NPK ratio that is suitable for rosemary, typically something balanced or slightly higher in phosphorus to promote root growth. Follow the manufacturer’s instructions for dilution and application. It’s also crucial to monitor the pH of your nutrient solution, ideally keeping it between 5.5 and 6.5 for optimal nutrient absorption.
How often should I change the nutrient solution?
The frequency of nutrient solution changes depends on the size of your container, the growth rate of your rosemary, and the concentration of the solution. As a general guideline, change the nutrient solution every 1-2 weeks. However, if you notice the solution becoming cloudy, discolored, or developing an unpleasant odor, change it immediately. Regularly monitoring the pH and EC (electrical conductivity) of the solution can also help you determine when a change is needed. EC measures the total dissolved salts in the solution, indicating the nutrient concentration.
What kind of lighting does soilless rosemary need?
Rosemary thrives in bright, sunny conditions. If you’re growing your rosemary indoors, you’ll need to provide supplemental lighting. LED grow lights are an excellent option because they are energy-efficient and provide the full spectrum of light that plants need for photosynthesis. Aim for at least 6-8 hours of light per day. Position the lights close enough to the plants to provide adequate intensity, but not so close that they burn the leaves.
How do I propagate rosemary cuttings for soilless growing?
Propagating rosemary cuttings for soilless growing is similar to propagating them for soil. Take cuttings that are 4-6 inches long from healthy, actively growing stems. Remove the leaves from the bottom inch of the cutting and place it in a glass of water or a container filled with LECA pebbles and nutrient solution. Ensure that the bottom nodes (where the leaves were removed) are submerged in the water or solution. Place the cuttings in a bright, indirect light location. Roots should begin to develop within a few weeks. Once the roots are about an inch long, you can transplant the cuttings into your soilless growing system.
Can I use tap water for my nutrient solution?
While you can use tap water, it’s essential to consider its quality. Tap water often contains chlorine or chloramine, which can be harmful to plants. It may also have high levels of minerals that can interfere with nutrient absorption. Ideally, use filtered water, distilled water, or rainwater for your nutrient solution. If you must use tap water, let it sit for 24 hours to allow the chlorine to dissipate.
What are some common problems I might encounter with soilless rosemary growing, and how can I fix them?
Some common problems include:
* Root Rot: This can occur if the roots are not properly aerated or if the nutrient solution is contaminated. Ensure good aeration by using an air stone or regularly changing the solution. Treat root rot with a fungicide or by removing the affected roots.
* Nutrient Deficiencies: Yellowing leaves or stunted growth can indicate nutrient deficiencies. Adjust your nutrient solution to provide the necessary nutrients.
* Pest Infestations: Although less common in soilless systems, pests can still occur. Inspect your plants regularly and treat any infestations with appropriate insecticides or organic pest control methods.
* Algae Growth: Algae can grow in the nutrient solution, especially if exposed to light. Use opaque containers to block light and prevent algae growth.
Is soilless rosemary growing suitable for all climates?
Yes, soilless rosemary growing is suitable for all climates, especially when done indoors. Because you are controlling the environment, you can provide the ideal conditions for rosemary growth regardless of the outdoor weather. However, if you are growing rosemary outdoors in a soilless system, you may need to provide protection from extreme temperatures or weather conditions.
How do I know when to harvest my soilless-grown rosemary?
You can harvest rosemary at any time once the plant is established. Simply snip off sprigs as needed. Regular harvesting encourages bushier growth. The flavor of rosemary is most intense just before it flowers.
Can I grow other herbs alongside rosemary in a soilless system?
Yes, you can grow other herbs alongside rosemary, but it’s essential to choose herbs with similar nutrient and lighting requirements. Good companions for rosemary include thyme, sage, and oregano. Avoid growing herbs that require significantly different pH levels or nutrient concentrations.


Leave a Comment