

Solvent and Baking Soda Cleaning: Unlock the power of a sparkling clean home with two simple ingredients! Have you ever stared at a stubborn stain, feeling defeated and reaching for harsh chemicals? I know I have! But what if I told you there’s a gentler, more effective way to tackle those tough messes? This DIY guide will reveal the secrets of combining the cleaning prowess of solvents with the natural scrubbing power of baking soda, creating a dynamic duo that will leave your surfaces gleaming.
Baking soda, also known as sodium bicarbonate, has been a household staple for centuries. Its use as a cleaning agent dates back to ancient Egypt, where it was used for everything from personal hygiene to polishing silver. Solvents, on the other hand, have evolved from natural turpentine to the more refined options we have today. The beauty of this combination lies in its simplicity and effectiveness.
In today’s world, we’re all looking for ways to simplify our lives and reduce our reliance on harsh chemicals. This solvent and baking soda cleaning method is perfect for anyone who wants a natural, effective, and budget-friendly way to keep their home clean. From removing grease stains to tackling stubborn grime, this DIY trick will become your new go-to solution. So, let’s dive in and discover how to harness the power of these two amazing ingredients!
DIY Cleaning Powerhouse: Solvent and Baking Soda Combo!
Hey everyone! I’m super excited to share one of my favorite DIY cleaning hacks with you – combining the power of a solvent (like mineral spirits or rubbing alcohol) with good old baking soda. This dynamic duo can tackle some seriously stubborn messes around the house, from greasy stovetops to sticky residue. Just remember to always prioritize safety and ventilation when working with solvents!
Safety First!
Before we dive in, let’s talk safety. Solvents can be flammable and irritating, so it’s crucial to take precautions:
* Ventilation is Key: Always work in a well-ventilated area. Open windows and doors, or even better, work outdoors if possible.
* Wear Gloves: Protect your skin by wearing gloves. Nitrile or rubber gloves work best.
* Eye Protection: Safety glasses or goggles are a must to prevent splashes from getting into your eyes.
* No Open Flames: Keep solvents away from open flames, sparks, and heat sources.
* Read the Label: Always read and follow the manufacturer’s instructions on the solvent container.
* Proper Disposal: Dispose of used solvents and rags properly according to local regulations. Don’t just toss them in the trash! Let rags dry completely outdoors before disposal.
Choosing Your Solvent
The type of solvent you use will depend on the mess you’re tackling. Here are a few options and their best uses:
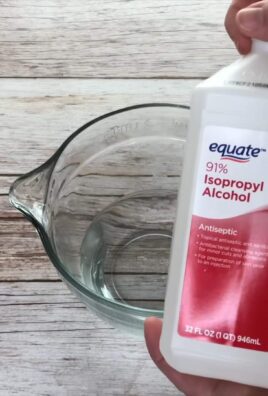
* Rubbing Alcohol (Isopropyl Alcohol): Great for removing sticky residue, ink stains, and disinfecting surfaces. It evaporates quickly.
* Mineral Spirits (Paint Thinner): Effective for removing grease, oil, wax, and paint splatters. It’s a stronger solvent, so use it with caution.
* Acetone (Nail Polish Remover): Powerful for dissolving adhesives, plastics, and some types of paint. Use it sparingly and with excellent ventilation.
* Citrus Solvent (Orange Oil): A more natural option that’s good for removing sticky residue and grease. It has a pleasant citrus scent.
Important Note: Always test the solvent on an inconspicuous area first to make sure it doesn’t damage the surface.
The Magic of Baking Soda
Baking soda (sodium bicarbonate) is a mild abrasive and deodorizer that complements solvents perfectly. It helps to scrub away grime and absorb odors. Plus, it’s non-toxic and readily available.
DIY Cleaning Paste: The General Recipe
This is the basic recipe we’ll be adapting for different cleaning tasks.
Ingredients:
* Baking soda
* Your chosen solvent
Tools:
* Mixing bowl or container
* Spoon or spatula
* Gloves
* Safety glasses
* Clean cloths or sponges
* Scrub brush (optional, for tougher messes)
Step-by-Step Instructions: Creating and Using the Paste
1. Prepare Your Workspace: Lay down some newspaper or a drop cloth to protect your work surface. Gather all your materials and put on your gloves and safety glasses. Ensure good ventilation.
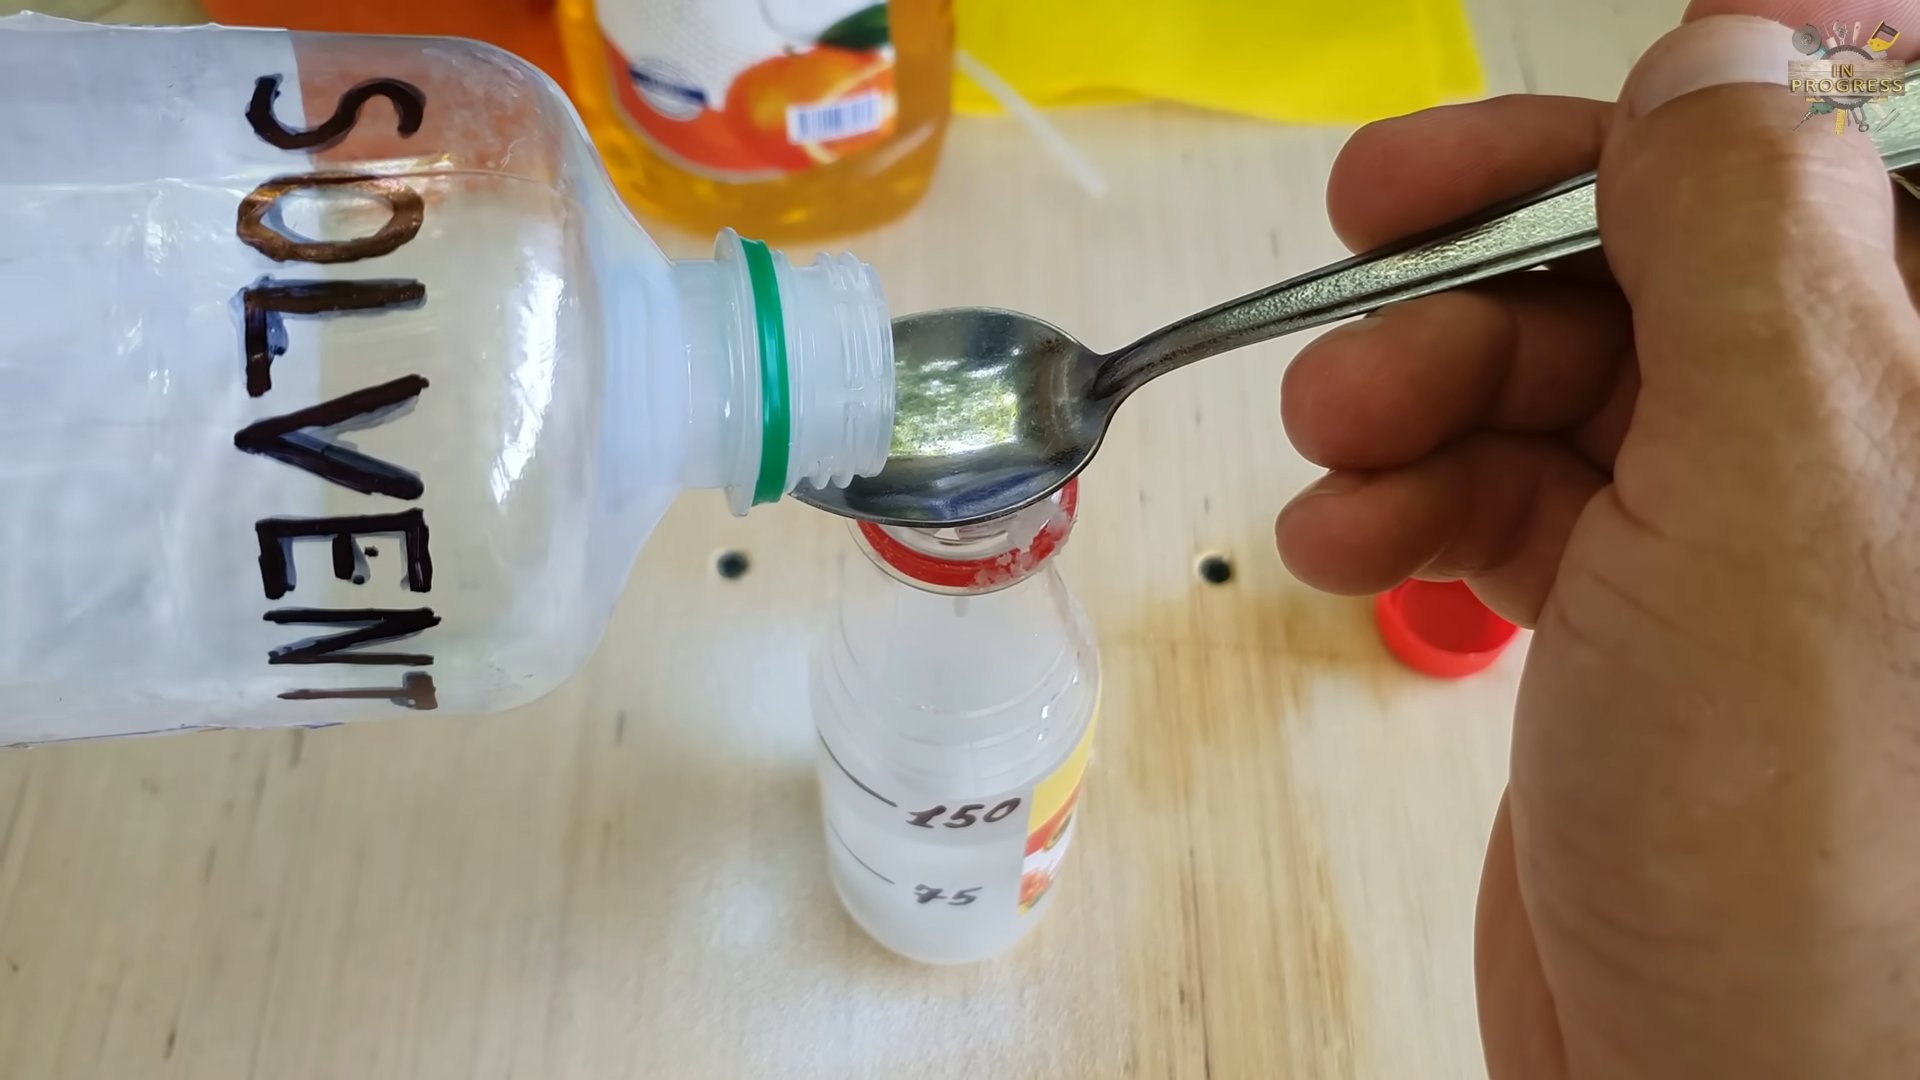
2. Mix the Paste: In your mixing bowl, start with about ½ cup of baking soda. Slowly add the solvent, a little at a time, while mixing with your spoon or spatula. You want to achieve a thick, spreadable paste consistency. It should be similar to toothpaste. Don’t add too much solvent at once, or it will become too runny.
3. Apply the Paste: Using your fingers (with gloves on!), a cloth, or a sponge, apply the paste to the area you want to clean. Make sure to cover the entire affected area.
4. Let it Sit: Allow the paste to sit for a few minutes to allow the solvent to work its magic. The amount of time will depend on the severity of the mess. For light cleaning, 5-10 minutes might be enough. For tougher messes, you can let it sit for up to 30 minutes. Just keep an eye on it and make sure the solvent isn’t damaging the surface.
5. Scrub (if needed): If the mess is particularly stubborn, use a scrub brush or a non-scratch scouring pad to gently scrub the area. Apply moderate pressure and work in circular motions.
6. Wipe Away the Residue: Use a clean, damp cloth to wipe away the paste and any remaining residue. You may need to rinse the cloth several times to remove all traces of the paste.
7. Dry the Surface: Finally, dry the surface with a clean, dry cloth. This will prevent water spots and leave the surface sparkling.
Specific Cleaning Applications: Tailoring the Recipe
Now, let’s get into some specific cleaning applications and how to adjust the recipe for each.
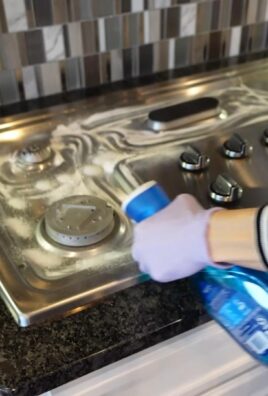
Cleaning a Greasy Stovetop
A greasy stovetop is a common kitchen woe. This method works wonders!
1. Choose Your Solvent: Mineral spirits or citrus solvent are excellent choices for removing grease.
2. Mix the Paste: Follow the general recipe, using mineral spirits or citrus solvent.
3. Apply and Let Sit: Apply the paste to the greasy areas of the stovetop. Let it sit for 15-20 minutes.
4. Scrub: Use a non-scratch scouring pad or a scrub brush to scrub away the grease.
5. Wipe and Dry: Wipe away the residue with a damp cloth and dry the stovetop thoroughly.
Removing Sticky Residue (Stickers, Tape, etc.)
Sticky residue can be a real pain to remove. This method is surprisingly effective.
1. Choose Your Solvent: Rubbing alcohol or citrus solvent are great for removing sticky residue. Acetone can also be used, but test it first!
2. Mix the Paste: Follow the general recipe, using rubbing alcohol or citrus solvent.
3. Apply and Let Sit: Apply the paste to the sticky residue. Let it sit for 5-10 minutes.
4. Scrub (if needed): If the residue is stubborn, use a plastic scraper or an old credit card to gently scrape it away.
5. Wipe and Dry: Wipe away the residue with a damp cloth and dry the surface.
Cleaning Grout
Grout can get grimy and discolored over time. This method can help brighten it up.
1. Choose Your Solvent: Rubbing alcohol is a good choice for cleaning grout, as it helps to disinfect and remove mildew.
2. Mix the Paste: Follow the general recipe, using rubbing alcohol. You can also add a few drops of dish soap to the paste for extra cleaning power.
3. Apply and Let Sit: Apply the paste to the grout lines. Let it sit for 10-15 minutes.
4. Scrub: Use a grout brush or an old toothbrush to scrub the grout lines.
5. Rinse and Dry: Rinse the area thoroughly with water and dry with a clean cloth.
Removing Paint Splatters
Accidental paint splatters happen! This method can help remove them from various surfaces.
1. Choose Your Solvent: Mineral spirits are usually the best choice for removing paint splatters, but the type of paint will determine the best solvent. For latex paint, try rubbing alcohol first.
2. Mix the Paste: Follow the general recipe, using mineral spirits (or rubbing alcohol for latex paint).
3. Apply and Let Sit: Apply the paste to the paint splatter. Let it sit for 10-15 minutes.
4. Scrape (if needed): Use a plastic scraper or a putty knife to gently scrape away the paint. Be careful not to scratch the surface.
5. Wipe and Dry: Wipe away the residue with a damp cloth and dry the surface.
Cleaning Stainless Steel Appliances
This method can help remove fingerprints, smudges, and water spots from stainless steel.
1. Choose Your Solvent: Rubbing alcohol is a good choice for cleaning stainless steel.
2. Mix the Paste: Follow the general recipe, using rubbing alcohol.
3. Apply and Let Sit: Apply the paste to the stainless steel surface. Let it sit for a few minutes.
4. Wipe and Dry: Wipe away the residue with a clean, damp cloth, following the grain of the stainless steel. Dry with a clean, dry cloth.
Troubleshooting Tips
* Paste Too Runny: If your paste is too runny, add more baking soda until you achieve the desired consistency.
* Paste Too Thick: If your paste is too thick, add a little more solvent, a drop at a time, until it’s spreadable.
* Solvent Not Working: If the solvent isn’t working, try a different solvent or let the paste sit for a longer period of time.
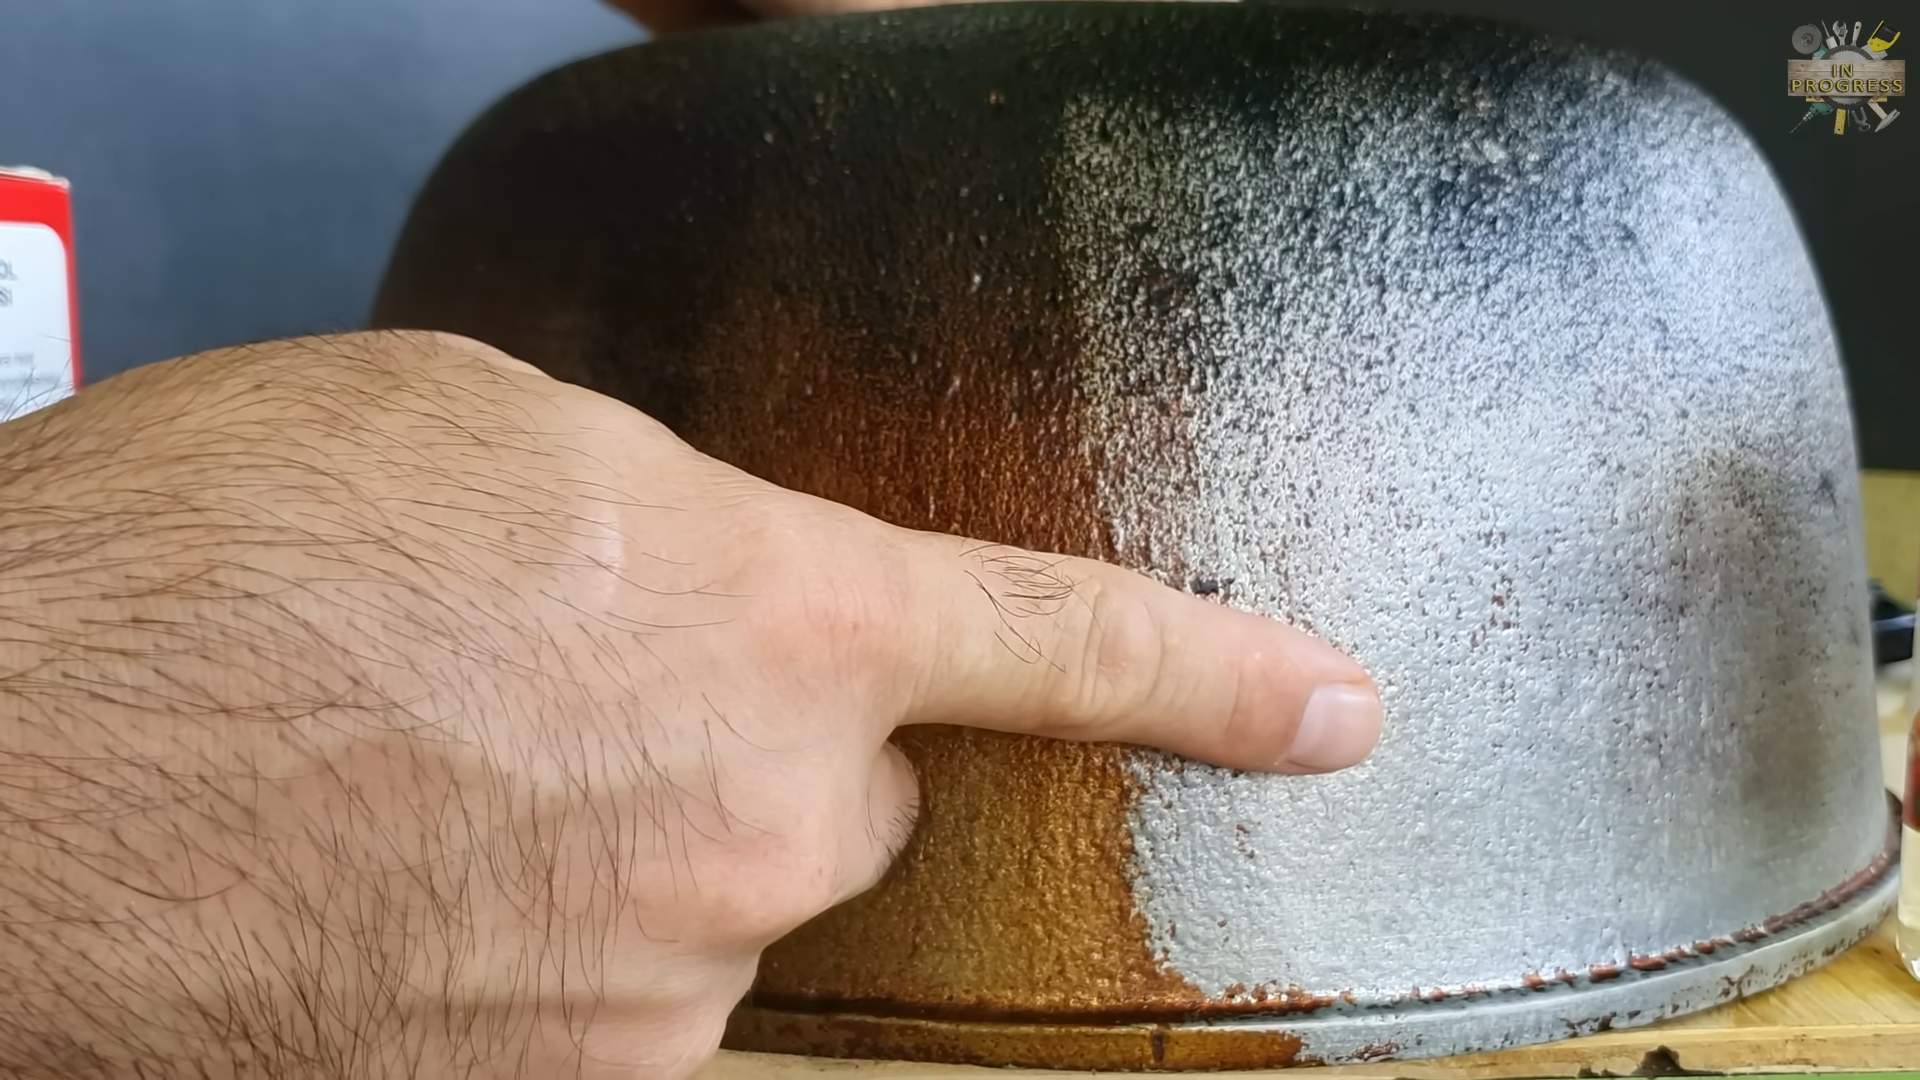
* Surface Damage: If you notice any damage to the surface, stop using the solvent immediately and try a
Conclusion
So, there you have it! Mastering the art of solvent and baking soda cleaning is not just a clever hack; it’s a game-changer for anyone looking to tackle stubborn stains, degrease surfaces, and restore items to their former glory without resorting to harsh chemicals or expensive professional services. We’ve walked you through the process, highlighting the safety precautions, the optimal ratios, and the step-by-step instructions that will empower you to achieve remarkable results.
Why is this DIY trick a must-try? Because it’s effective, economical, and environmentally conscious. It leverages the potent cleaning power of a solvent, carefully balanced with the gentle abrasive and deodorizing properties of baking soda. This combination allows you to lift grime, dissolve grease, and neutralize odors that other cleaning methods simply can’t touch. Think about those grimy oven racks, the stained grout in your bathroom, or the sticky residue on your kitchen cabinets. All of these can be addressed with this simple yet powerful solution.
But the beauty of this method lies not only in its effectiveness but also in its versatility. Feel free to experiment with different solvents depending on the task at hand. For instance, isopropyl alcohol works wonders on electronics and delicate surfaces, while mineral spirits are ideal for removing paint and varnish. You can also adjust the ratio of solvent to baking soda to create a paste or a more liquid solution, depending on the surface you’re cleaning. For particularly stubborn stains, consider adding a few drops of dish soap to enhance the cleaning power.
Don’t be afraid to get creative! Try adding a few drops of essential oil, like lemon or lavender, to your cleaning solution for a fresh, natural scent. Just be sure to test the solution on an inconspicuous area first to ensure it doesn’t damage the surface.
We understand that trying a new cleaning method can be a little daunting, but we encourage you to take the plunge. The results are well worth the effort, and you’ll be amazed at how much you can achieve with just two simple ingredients. Remember to always prioritize safety by wearing gloves and working in a well-ventilated area.
We’re confident that once you experience the cleaning prowess of the solvent and baking soda combination, you’ll wonder how you ever lived without it. It’s a cost-effective, eco-friendly, and remarkably effective way to keep your home sparkling clean.
So, go ahead and give it a try! We’re eager to hear about your experiences. Share your before-and-after photos, your tips and tricks, and any variations you’ve discovered in the comments section below. Let’s build a community of cleaning enthusiasts who are passionate about finding innovative and sustainable ways to keep our homes clean and healthy. Your feedback will not only help other readers but also inspire us to continue sharing valuable cleaning tips and tricks. We believe that by sharing our knowledge and experiences, we can all create cleaner, healthier, and happier homes. Let the cleaning adventures begin!
Frequently Asked Questions (FAQ)
What types of solvents can I use with baking soda for cleaning?
The best type of solvent to use depends on the cleaning task. Isopropyl alcohol is excellent for electronics, glass, and removing sticky residues. Mineral spirits are effective for removing paint, varnish, and grease. Acetone can be used for dissolving certain types of adhesives and plastics, but use it with extreme caution as it’s very strong and can damage some surfaces. Always test the solvent on an inconspicuous area first to ensure it doesn’t cause any discoloration or damage. For general cleaning, white vinegar can be considered a milder, more natural solvent alternative, although its effectiveness varies depending on the stain or grime. Remember to always check the manufacturer’s instructions for the item you are cleaning before using any solvent.
Is it safe to mix baking soda and solvent?
Generally, yes, it is safe to mix baking soda and solvent for cleaning purposes, but with important caveats. The key is to use common sense and follow safety precautions. Always work in a well-ventilated area to avoid inhaling fumes. Wear gloves to protect your skin from irritation. Avoid mixing solvents with baking soda in a closed container, as this could create pressure. Never mix baking soda with bleach or ammonia, as this can create dangerous and toxic gases. When in doubt, consult the safety data sheet (SDS) for the specific solvent you are using.
What is the ideal ratio of solvent to baking soda for cleaning?
The ideal ratio depends on the specific cleaning task and the consistency you desire. For a general-purpose cleaning paste, a good starting point is a 1:1 ratio of solvent to baking soda. This will create a thick paste that is ideal for scrubbing surfaces. For a more liquid solution, you can increase the amount of solvent. For example, a 2:1 ratio of solvent to baking soda will create a thinner solution that is suitable for spraying or wiping surfaces. Experiment with different ratios to find what works best for your specific needs. Remember to always test the solution on an inconspicuous area first to ensure it doesn’t damage the surface.
Can I use this cleaning method on all surfaces?
No, this cleaning method is not suitable for all surfaces. Some surfaces are more sensitive to solvents than others. For example, some plastics can be damaged by acetone, and some fabrics can be discolored by mineral spirits. Always test the cleaning solution on an inconspicuous area first to ensure it doesn’t cause any damage. Avoid using this method on delicate or porous surfaces, such as wood, leather, or silk. When in doubt, consult the manufacturer’s instructions for the item you are cleaning.
How do I dispose of the used solvent and baking soda mixture?
Proper disposal of the used solvent and baking soda mixture is crucial for environmental safety. Never pour the mixture down the drain, as this can contaminate the water supply. Instead, allow the solvent to evaporate completely in a well-ventilated area. Once the solvent has evaporated, the remaining baking soda can be disposed of in the trash. Alternatively, you can contact your local waste management facility for guidance on proper disposal methods. Some facilities may offer hazardous waste disposal programs for solvents and other chemicals.
What safety precautions should I take when using solvent and baking soda for cleaning?
Safety is paramount when working with solvents. Always wear gloves to protect your skin from irritation. Work in a well-ventilated area to avoid inhaling fumes. Avoid contact with eyes and skin. If contact occurs, rinse immediately with plenty of water. Keep solvents out of reach of children and pets. Never smoke or use open flames near solvents. Store solvents in a cool, dry place away from heat and ignition sources. Read and follow the manufacturer’s instructions for the specific solvent you are using.
Can I add other ingredients to the solvent and baking soda mixture?
Yes, you can add other ingredients to the solvent and baking soda mixture to enhance its cleaning power or add a pleasant scent. For example, a few drops of dish soap can help to cut through grease and grime. Essential oils, such as lemon or lavender, can add a fresh, natural scent. However, be cautious when adding other ingredients, as some combinations may be incompatible or create unwanted reactions. Always test the mixture on an inconspicuous area first to ensure it doesn’t damage the surface.
How long should I let the solvent and baking soda mixture sit on a surface before wiping it off?
The amount of time you should let the mixture sit on a surface depends on the severity of the stain or grime. For light cleaning, a few minutes may be sufficient. For more stubborn stains, you may need to let the mixture sit for 15-30 minutes. However, avoid letting the mixture dry completely on the surface, as this can make it more difficult to remove. Always test the mixture on an inconspicuous area first to ensure it doesn’t damage the surface.
What if the solvent and baking soda mixture doesn’t remove the stain completely?
If the solvent and baking soda mixture doesn’t remove the stain completely, you can try repeating the process. You can also try using a stronger solvent or increasing the concentration of baking soda. For particularly stubborn stains, you may need to use a specialized stain remover. However, always test any new cleaning solution on an inconspicuous area first to ensure it doesn’t damage the surface. If you’re unsure about how to proceed, consult a professional cleaning service.
Leave a Comment